Pages

Showing posts with label Recycled Christmas. Show all posts

Saturday, December 25, 2010

Recycled Christmas: plastic bottle flowers

This post was originally featured as part of Julie Balzer's Handmade Holidays series. See it here


Earlier in the year I saw a photo on Elizabeth Kartchner’s blog of some decorations they had at Spark. I wanted to try and work out how they had done some plastic flowers I saw which they had hanging in the entryways. I made my version into table decorations instead.


Firstly hunt through your recycling pile and pull out a bunch of plastic bottles of different sizes and shapes. Make sure they're nice and clean of course!


Wash them, pull the labels off, and cut them in half (or at least, cut about 3 or 4 inches off the top) keeping the top end. Don't worry about the coloured plastic rings - it's not worth the hassle trying to cut them off..... believe me! And we're only going to paint over the top of them anyway.


Next cut slits in them and round the bottom edges to create different kinds of petal shapes.
You really don't need to get pedantic and start measuring things or using a template or anything like that. I think the beauty is in the randomness.


This is the really fun part!!
Pull out your trusty heat gun and turn that thing in the direction of your plastic bottles. Watch how quickly each of the petals melts and warps and curls.

WARNING: you do need to be very careful with this step because melted plastic can get VERY hot and can drip and burn things such as your hands. So please do this with extra caution - go very slow because it doesn't take much to melt the plastic, and you might want to think about wearing gloves. 


Play around with different size bottles, different petal designs and different ways of melting the plastic (for example the petals will melt in different directions if you point the heat gun from above or below). And when they've cooled use some acrylic spray paint to give them a quick and even coat of colour.


And here's the finished product. I used my hot glue gun to glue a stick from the garden onto the bottom as a stem, and a scrap of tinsel in the middle to hide the fact that I hot-glued a stick from the garden onto the bottom as a stem!! To continue our recycled theme I've even used an empty bottle as a vase, covered in newspaper sprayed with gold paint. Not quite sure this is the ultimate plan of presentation on the Christmas table, but it's good enough for now! Promise to show you photos of the day hey?!


Hope everyone is having a very Merry Christmas today wherever you may be, and however you celebrate!

Friday, December 24, 2010

Recycled Christmas: vintage paper wreath

This was originally posted on Julie Balzer's Holidays Handmade series

For the past few years my Mum and my Aunt have been taking in turns hosting our big family Christmas dinner. In all honesty, it's turning into a bit of friendly competition as they keep trying to outdo each other in the cooking/hosting/decorating stakes. It's currently at the point where my Mum had asked me and my sister to start thinking about ideas for a theme in March!!


Now it just so happened that I won a copy of GreenCraft magazine around about the same time and it was just so inspiring that I automatically came up with the idea of having a "Recycled Christmas" as our theme this year. And I've dutifully set about making some very simple decorative items for our party.

First up was a wreath for the door. I cheated a little bit when I decided the easiest way was to buy a foam base for my wreath! If you want to remain true to the idea of recycled/green products you could make your own from vines or something similar - but this was just way too hard and time consuming for me at this time of year :-)


So I painted my foam wreath with a gold acrylic spray-paint, not being aware that some chemical in the paint would eat away at the foam and leave a result like this swiss-cheese appearance. Oh well! It's going to get covered up anyway, but perhaps you might want to do it the old fashioned way if you want to avoid this :-)


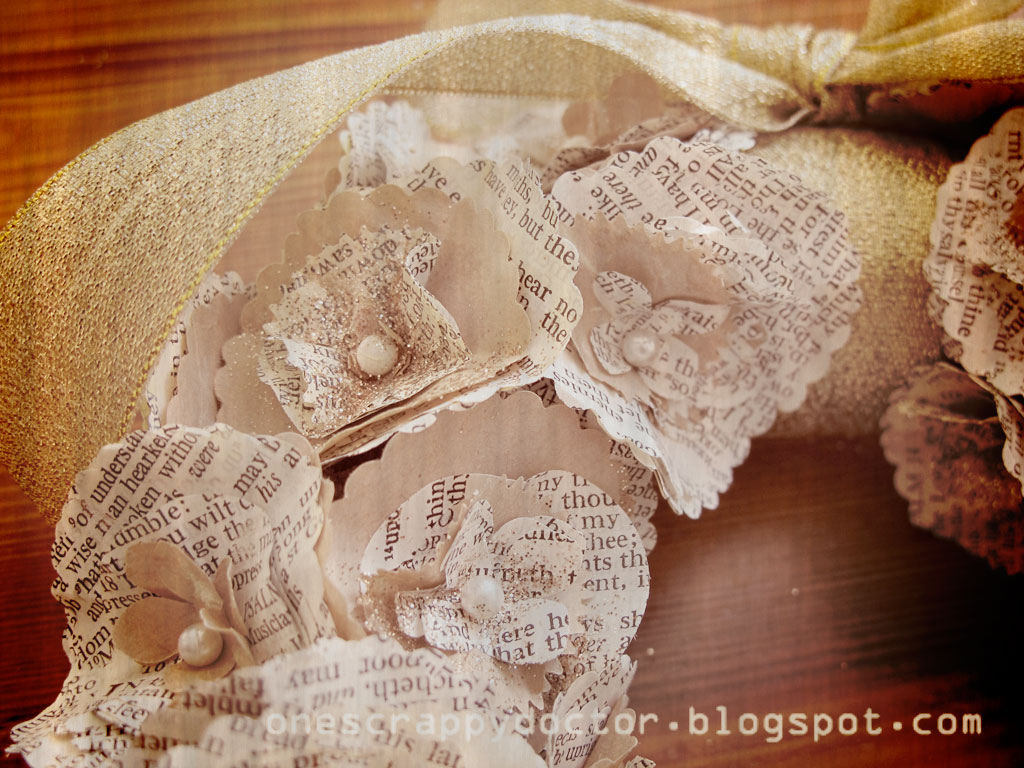
I love my punches! I don't think a scrappy project goes by without me cracking out some Martha Stewart :-) So I punched about a million (or at least that's what it felt like!) shapes from vintage book pages and a brown paper bag that I got as packaging.


Then I went about layering up lots of different shapes and securing them with a pin in the centre. Each of these flowers has at least 10 layers, but I didn't bother counting each one, I simply just grabbed a couple from each stack of my punched shapes at random.


Next you want to scrunch up the layers of paper to give it a bit more texture. I also sprayed a few with Irridescent Gold Glimmermist, and sprinkled some glitter on others. It's quite a similar method as Julie uses in her tutorial on newspaper flowers which you can read here.


Since I used pins in the centre of flowers (instead of brads or buttons) I could then very easily stick them into my foam wreath to make a lovely arrangement. And if I wasn't happy with the placement, then it was all too easy to pull them out and try again.


Lastly, tie a great big bow around the top to give it a bit of pizazz!


As you can see the materials and colours I have chosen are fairly monotone, but that's because along with our theme of a Recycled Christmas we've chosen cream, kraft and gold as our colour-scheme. But there's nothing stopping you from using more traditional supplies like scrapbook paper in red and green, or try other materials like fabric or felt for example. Go wherever your imagination takes you!


Handmade by Suzanne is having 35% off everything in her Christmas section. That's a lot of products by a lot of brands. You definitely don't want to miss out on this one! If you're anything like me you're going to take a lot of photos tomorrow which will need scrapping! 

Have a very Merry Christmas tomorrow :-)

Recycled Christmas: Monogram Badges

Well, these aren't recycled at all really. But they're part of our decorations for our Recycled Christmas dinner so I thought I would show you anyway.


Keeping with our colour scheme of cream, kraft and gold, I've also added some traditional red and green highlights to make these monogrammed badges.


Each of these little textural beauties will have a brooch pin stuck on the back of it and will then adorn our Christmas crackers. These will act as our place-names as we sit down for dinner, and then can be removed and worn throughout the evening.


To make these I started off die-cutting some felt flowers or circles (yes, you really can cut felt in your Cuttlebug!), adding a punched scalloped circle from kraft cardstock, and then layering some embellishments on top.


Basically I grabbed a whole bunch of random stuff from my stash that coordinated with the colour scheme. And added some glitter of course!


The monograms themselves are also just simply die-cut from red and green cardstock. 
I'll have to show you pictures later of our guests wearing them hey?!

Sunday, December 12, 2010

Recycled Christmas: Vinyl LP platter

So this latest instalment of 'A Recycled Christmas' comes courtesy of my mum.... thanks mum!
Not being a blogger, or being aware ahead of time that I would have turned this into a tutorial had I known she was doing this awesome thing, she didn't take any photos of the process. But she's sent me these photos of the end product and a description of what she did which I'll relay to you :-)


All you need is your old unwanted vinyl records, an oven and some oven-proof bowls for moulding your platters. Trust me, this is really easy.


If you don't have any old vinyl records hanging around yourself, you can probably find them at any op-shop / thrift-store you care to visit. And probably pretty cheap too. Once you've got a stash, here's what you do...


Preheat your oven to 200 degrees Celcius (approx 400 degrees Farenheit). Place your oven-proof bowl upside down on an oven tray and balance the vinyl record on top. Pop it into the oven for approximately 4 minutes (or longer depending on your oven).
 

One of two things will happen depending on the thickness / size of your vinyl record. Either it will be soft enough to melt over the bowl by itself and your work is done. Or if it's just pliable you can use your hands (with oven-mitts on please!) to shape and mould the record over your bowl. Then just leave them to cool and harden.


And there you have it..... your very own recycled vinyl LP platter. If you want to get fancy like my mum has you can attach handles (stolen from an old cake-server) through some holes drilled in the centre.

Here's another tip from my mum: If your vinyl record is too big for the bowl it's sitting on, it will melt over the sides but then stop when it hits the oven tray - leaving your bowl with a flat lip around it. You might not consider this such a bad thing. But if you want to avoid it then you'll need to prop up your moulding-bowl onto something higher (like another bowl!)

Also - I've got no idea on whether it's safe to eat food directly off this melted vinyl so I would suggest perhaps only serving wrapped food, or cover it with something first just in case.

My December Giveaway is open for a couple more days. Enter it here

xx

Wednesday, December 8, 2010

A Recycled Christmas - Magazine Tree

A big Christmassy welcome to anyone who might be here visiting because you saw my Guest Blogger gig on Julie's Holiday's Handmade series. Or for those who are my regular followers - go over and check out my Recycled Christmas post where I show you how to make a paper wreath and a plastic-bottle flower arrangement. There's lots of other fantastic tutorials going up this week too so definitely worth a look.


I thought I would continue on in my series on a Recycled Christmas today with this magazine tree. It's super-simple to make, although does take some patience..... a good one to do in front of the TV perhaps! (I snapped pictures of my sister as she folded this tree. The whole family is involved in making Recycled Christmas decorations this year. Coming up later on will be my mum's vinyl record cake platter.)


Take an old magazine or paperback book, doesn't really matter what size but the more pages in it the fuller your Christmas tree will be. I'm pretty sure we were using a Reader's Digest here which was perfect really. Starting with a right-hand page, fold it down towards the spine as in the picture above (she had already done quite a number of the pages already by the time I took this photo)


With the same page, fold it towards the spine again.


Now turn the page over, and fold up the little triangle that is hanging down below the bottom.
And that's it. Repeat that a gazillion times and you're done :-)


When you've finished folding the entire magazine you'll be able to fan it around and glue the two covers together back-to-back to complete the circle. Alternatively, if your tree isn't full enough you can glue two magazines together for more pages.


This is really only a base (although you could leave it just as it is). We gave our trees a quick makeover with some gold spray-paint. And then embellish however you would like. Here I've got one of my Aluminium Angels perched on top. I showed you how to make these in an earlier Recycled Christmas post.


But perhaps some tinsel? Or baubles? Or lights!! Yes lights might like really awesome.... I'm going to do that!

If you're new here, you might also want to check out my December Giveaway. Or just generally have a look around! Let me know if you're here visiting from Julie's blog :-) And stay tuned for more Recycled Christmas ideas coming up.

Saturday, December 4, 2010

Aluminium Angels

OOoooooohh yeah!
I've been soooo looking forward to this :-)

Between now and Christmas I'm going to be sharing a series of posts with tutorials, taking you through a variety of projects I've been putting together for our annual Christmas dinner party.
 

For the past few years my Mum and my Aunt have been taking in turns hosting our big family Christmas dinner. In all honesty, it's turning into a bit of friendly competition as they keep trying to outdo each other in the cooking/hosting/decorating stakes! It's currently at the point where my Mum had asked me and my sister to start thinking about ideas for a theme in March!!

Now it just so happened that I won a copy of GreenCraft magazine around about the same time and it was just so inspiring that I automatically came up with the idea of having a "Recycled Christmas" as our theme this year. And I've dutifully set about making some very simple decorative items for our party.

The first project I'll be sharing is these aluminium angels - made out of old (but washed!!) tin cans.


So grab some sharp scissors and cut off the top and bottom of your cans, as well as through the length of it so you've effectively made yourself a rectangle aluminium sheet.


I experimented with making my own template for the angels which I copied onto the back side of the tin and then cut out.


Please be careful of the sharp edges and points on these - they can easily cut you. We'll deal with them at the end.


I tried a few different glues for this - even buying one which specifically stated it was for metal. But ultimately the only thing that worked was my hot glue gun. But be careful of this too because not only is the glue hot, but it will make the tin very hot also.


So glue your angel body into a cone shape, and then stick each wing on.


I made the heads by cutting some foam balls in half (keeping in mind I was trying to limit myself to recycled supplies or things I already had on hand. I'm sure there are better ways of doing this part) and sticking them onto a halo I fashioned out of pipe-cleaners. By keeping a long horizontal wire it was easier to glue it to the inside of the 'body'.

And here's all my little angels lined up in a row. Aren't they just adorable?!


To make the sharp edges less dangerous I applied a thick layer of my hot glue all along the edges and dipped them in some pretty glitter. So now they're not only safe, but sparkly!!

So are you excited now? Have I whetted your appetite? Because there's a whole lot more recycled projects coming your way soon!

PS. Let me know if you want the angel template. I planned to include it with this post, but I'm not yet that organised and was keen to get the tutorials underway :-)

LinkWithin

Related Posts with Thumbnails