ETA: General Sales have STARTED!!
Want to see the kits "in real life"? This month I've uploaded a YouTube video of me opening my 4 kits (the scrapbook Main Kit and each of the 3 Add Ons)! You are able to see it here. I go through each paper and embellishment in detail so you can see exactly what you'll receive. I think it's a great way of getting a true feel for the nature of the kits.
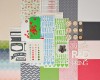
I admit, at first glance I thought this Main Kit was a little too masculine to immediately appeal to me, but then I realised the greens and blues weren't boy colours at all.... they're Spring colours! Match them with the scattering of pink and red and you've got a lovely fresh and flowery combination.

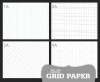
But it's true - I think the kit can swing both ways. And I wanted to prove it with my two Main Kit Only layouts! I used the same base for both of them (the plain grid paper is a b-side to the navy chevrons, and the bright green as my border colour) but went in entirely different directions with the papers and embellishments I chose. I think you're about to see how versatile this kit really is!

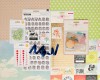
1. First up, "Bookworm". It was inspired by the 'Check It Out' paper with the date stamps on it. It reminded me of borrowing books from the library (which is obviously what it's supposed to be!) so I took it one step further and made my own pocket to pair beside it. I'm not sure if everyone's else library used the same system - but this is what my library books used to look like when I was a kid. A pocket with a tag in it, and a page for stamping the due date. There's going to be a tutorial on the blog later in the month with how I made my entire page... including that brush script title!

Bookworm Supplies: Office Hours Main Kit, Hello Forever Printables, Project Life Digital Stamps.

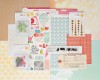
2. As I said, "Spring Baby" starts off with the same base of white and green... but then I took it in an entirely more girly direction. I definitely tried to capture the spring colours here and focused more on the pink, cream and red. Can you believe I even managed to make some handmade flowers for this?! Very atypical of my style in recent times... but this layout about my niece was screaming out for them ;-)

Spring Baby Supplies: Office Hours Main Kit, Hello Forever Printables, Card Kit Digital Cutting Files

The first Add On I worked with is called "Coffee Break" and it's my absolute favourite! I made two layouts straight up (actually before I'd even made my Main Kit layouts!)

3. "Live Life" is such a different layout for me. Not my usual style at all. My husband mumbled something along the lines of ..... I'm glad you're not stuck in a rut... HHHmmmm?! At least he's noticing! I was actually inspired by this pin on Pinterest and decided to recreate it in layout form. I love the little clusters of embellishments all around. I think it gives each one the focus it needs so that you notice them all individually.

Live Life Supplies: Coffee Break Add On, Rolodex Add On (just for the blue 'm') More Kraft

4. "Bug Girl" also uses the Coffee Break Add On, but this time I focused on the pink and yellow combination. The Dear Lizzy stickers are just the cutest and I had so much fun piling them up and layering them around my photo. I think I wanted to really emphasise the 'girl' part of "Bug Girl"... rather than the bugs ;-)

Bug Girl Supplies: Coffee Break Add On, Hello Forever Printables, More White

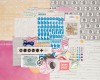
"To Do" was the next Add On I wanted to work with. A very definite Spring time kit here, and I love the fun chalkboard Thickers.

5. In making "Hello Today" I wanted to do two things.... layer up the papers so it looked like a spring scene (ie. brown at the bottom for earth, then green for grass, some pink flowers and all that bright blue sky) and I wanted to feature all those colourful sequins in a way you wouldn't expect. I made a shaker box for them out of the packaging the green chipboard cameras come in which is much the same technique I showed you here in my video tutorial ages ago.

Hello Today Supplies: To Do Add On, Office Hours Main Kit, Hello Forever Printable Labels

The Rolodex Add On has quite the punch of colour with that bright magenta paper and blue Thickers, but I took my layout is a slightly more monochrome direction!

6. "Golden Ticket" finally sees me getting around to telling the story of joining the Studio Calico Creative Team. With so much to say I knew I needed lots of space for my journaling. I could have hidden it away, or made it into a booklet which you've seen me do in the last 2 months, but I chose to have it all featured on a double page layout instead. I love how each half of this can be seen as a page in it's own right, but it also matches together as well. Tied together by the repetitive stamping of the cute circle images.

Golden Ticket Supplies: Rolodex Add On, To Do Add On, More Vanilla


7. My final layout "Fun Beneath the Skies" is mainly build out of the Main Office Hours Kit with a few embellishments from each of the Add Ons, but it was the IACB Printables which made a real difference here. They're great for adding more layers behind a photo which you can see I obviously like to do! I went with lots of gold bits in this layout, and a touch of sparkle to fit with the magical theme of the page.

Fun Supplies: Office Hours Main Kit, To Do Add On, Rolodex Add On, Coffee Break Add On, In a Creative Bubble Printables, More Grid Paper
You can see more details about all these layouts and the supplies I used in my Studio Calico gallery.
Thinking of starting a subscription? Sign up here. In the meanwhile... happy shopping!

Office Hours Supplies: