Pages

Saturday, January 31, 2015

The Story of the Peacock Card

I've definitely got a whole feather-obsession thing going on right now. My Instagram account is filled with different images of me making different versions of them. Some of them I have plans for... like when I posted all these peacock feathers in progress. Some of them (like this one) I don't know what I'm going to do with yet :-)


The photo above was merely step one in the great peacock-feather-adventure-card which ultimately ended up looking like this. 


I was super super excited to have my card and it's corresponding tutorial featured last week as a Guest Post on the blog of none-other than my long time crafty idol Julie Fei Fan Balzer!!


The feathers are actually made with a 6x6" stencil that Julie designed. It's a couple of years old now, but still remains one of my favourites, so when Julie asked for a tutorial using her stencils I knew just which one I was going to reach for. 


After much texture paste, watercolours and of course glitter (!) I had a whole flock of feathers that needed nothing anything else but a sentiment in order to create this fun card. Kinda looks like a firework explosion of peacock feathers don't you think?


If you're interested in checking out the whole tutorial of how this card came together from beginning to end then please go over and visit Julie's blog. Maybe you'll be inspired to create something feathery this weekend?

Photobucket

Wednesday, January 28, 2015

Cirque Reveal


The full reveal of the latest Studio Calico kits "Cirque" is set for under two hours from now, so things are getting rather exciting over there on the blog and message boards!

I was lucky enough as a Contributor to be sent a couple of the scrapbook kits this month and let me tell you they are vibrant, they are on-trend and they are spectacular. Here's a little gathering of some of my favourite bits. And if that doesn't get you in the mood to make something then I don't know what will!


I'm ridiculously ashamed to say that so far I've only had the time to create a single layout from them (I've been SUPER-busy with another secret major project that is set to be revealed rather soon!), but what I did make with the Flying Trapeze and High Wire Add Ons I'm pretty happy with!


There'll be a tutorial on the Studio Calico blog later on in the month sharing my inspiration and process behind making those tassels and feather hanging things.

Along with the reveal of all the kits also comes some new products, and whilst there is lots that are on my shopping list to get if I'm quick enough at reveal (Noah Alphabet Stamps anyone?!), here's just a couple I'll draw your attention to.


This copper foil vellum paper pad is really cool. As someone suggested on the message boards, gold foil sometimes feel like it's for special occasions and might hinder you from cutting into it, but the copper seems like it could be for everyday use ;-)

And then there's the re-release of this rather popular stamp designed by Kim Stewart. You might remember it was included in one of the Add On kits back in October, and among other projects I made this card using it. Pretty cool hey? Well if you missed out on the kit, but just wanted to snatch up the stamp - here's your opportunity!


Don't forget about the digital shop as well (especially good for us International shoppers hey?!). Especially cool addition this year is the digital scrapbook papers, and digital Project Life cards for each months reveal. These are exactly the same as what you get in the kits, so even if you get the real deal you might just want to have a digital back up copy for 'just in case' ;-)


Happy Scrapping!
xx
Photobucket

Monday, January 26, 2015

Bethany's Fruit Series

In the last couple of weeks since I started my maternity leave and the girls have been on school holidays, something remarkable has happened. I've been spending all my time with them, and we've been doing heaps of crafting, and it's been really amazing!

Not unexpected. I never said unexpected :-)
But super cool!


We've been experimenting with different crafts and lots of techniques. The girls have always enjoyed painting the best of all, so I thought we could take it to the next level and try and learn a thing or two about the technical aspects of waterpainting.


We just starting simple. After all, the girls are only 8 and 5 and they're not really that interested in colour theory or which brush is best or what paint to buy... they just want some simple tricks to paint some more realistic pictures, but mainly just to have fun! So literally all I taught them was the idea of creating layers of colour. Starting with a lighter colour and then layering different tones of the same colour over the top.

Seriously. That was it.


Bethany got the idea into her head about painting different fruits, so we looked up examples of other people's work on Google for inspiration and then I left her to it. And over the next few days these are the pieces that resulted...


A pineapple, kiwifruit, mystery red fruit (it began life as a cherry, but we've decided it probably looks more like an apple!) and a passionfruit.  Not bad for a first effort hey?

I was so impressed even with just the first one (the pineapple) that I immediately made it the wallpaper on my phone. And the whole collection has been added to my inspiration board in my scrap room.

Since I started sharing them on Instagram it seems like a lot of you agree that these are pretty cool. And there were even requests for copies so that you could do the same! So I'm pleased to announce that at the bottom of this post you'll find the links for you to download each of the four fruit! Then you should be able to use them for whatever you would like - art prints, phone or computer wallpapers, journaling cards etc etc. Can I please just request that if you download her pictures that you leave a comment to let us know, and to tell us what you plan on doing with them? I'm sure Bethany would love to hear! And if you are on Instagram, it would be absolutely awesome if you shared something there and tagged Bethany or me into your post. My user name is 'natalieelph' and Bethany and Moriah share an account where they post all their artwork and photos with the user name 'elphiekids'.


And just to prove that anything her sister does, Moriah can do too, she came up with her own series of fruit paintings!

So proud of my two artistic girls :-)

Link to Apple pdf
Link to Kiwifruit pdf
Link to Passionfruit pdf
Link to Pineapple pdf


PS. I've also been asked what we used to create these paintings, so here's some links to the products:


We use this system for almost all our waterpainting for a couple of reasons. I find the colours in the watercolour papers really vibrant, you get heaps of variety in the set, they're very easy to use and because it's virtually mess-free!


In comparison, Moriah's painting was done with a cheap supermaket set of 12 watercolours in a palette, a normal brush, and plain ol' printer paper. Good results, but you can definitely see the difference.

Hope that helps?

Photobucket

Saturday, January 24, 2015

My Happy Place

Despite my lack of projects around here recently I've actually got soooo much going on behind the scenes it's ridiculous. It's also ridiculously awesome to be able to spend so much of my time crafting these days! To get a much better representation of what I've been up to I encourage you to check out my Instagram account (username: natalieelph). It's much more up to date with what I'm doing ;-)


Meanwhile, one of the tasks on my never-ending to-do list is to fill in some of the million gaps in my Project Life Handbook from last year. Not that I'm doing it traditionally, but more that I've got lots of photos and lots of memories that I really want to get documented in it.


An obvious place to start was with our beach holiday back in September. I've done a couple of layouts about it, but I think some Handbook spreads are better equipped to getting the stories down properly because you can add more photos, and probably more journaling too (although I didn't write much down on this spread ironically!)


This spread came together quite easily with the combination of my Studio Calico The Underground Project Life Kit and the addition of lots of stamps from the Summer Set by Kellie Stamps. I love how many different options of text and sentiments you get in her sets, which make it really good for Project Lifing.

More spreads have been completed, and I'm hoping to get back here really quite regularly over the next week to share them. I'm also planning on having something quite exciting for you to download by the end of the weekend as well .... but maybe don't hold me to that!

Photobucket

Thursday, January 22, 2015

Latest News at Studio Calico

So it's been ages since I last blogged (by my standards anyway!) and that's because since I started my maternity leave at the start of last week it's been one 'adventure' after another. For a start, I ironically found myself getting admitted to hospital as a patient on Day 2. What a different perspective!! Everything is all ok now, but I have to take it easy for the rest of my pregnancy. Meanwhile, I've also been busy working on some super secret crafty projects which will all be revealed soon ;-) And yes, I do consider crafting as fitting into the category of 'taking it easy'!.... it's not a 14 hour shift on the labour ward after all!!

So here's some things that have been going on in the world of Studio Calico that I need to share with you. Because it's awesome is why ;-)


The 
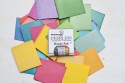
new size albums have just been released in the shop. What's this new size you might ask? It's 9x12" and I reckon that's just going to be perfect for me. For 2015 I've been contemplating how I go about my version of Project Life. Currently I work in a 6x8" Handbook which I've been loving - but I've dabbled with the idea of going larger. However, the 12x12" Project Life albums still scare me as I think about how I would fill up all that space! So perhaps this is the perfect middle ground... now I just need to figure out what colour scheme to go with. These are the choices: 

Colors Available for 9x12" Albums (numbers correspond to photo above):

1. Woodgrain Cloth
2. Black Cloth
3. Linen Cloth
4. Gold Classic Leather
5. White Classic Leather
6. Clean Slate Cloth

Colors Available for 6x8" Handbooks:
7. Black Cloth
8. Woodgrain Cloth

Two new Handbooks have been released too. Keep in mind, these are a whole new version of Handbook - they've got 6 rings which make them compatible with lots of other brands of organisers, but they aren't compatible with the old Handbooks.

And here's the new styles of page protectors that are available for purchase as well. I love the smaller square ones! These are the multipacks that are available right now, but on the 28th they'll also be available to purchase as individual packs.


PS. If you're been thinking of a new kit subscription for 2015 then I can't recommend Studio Calico highly enough. And that's not just a biased opinion because I'm on the Contributing Team - I've actually been a subscriber myself since 2009 so I think I know what I'm talking about :-)
There's no better time to sign up with this great deal too. Check it out:


You can start a new subscription for only $5 for the first month's kit! 
Use the code FIVESTARTSB to subscribe to our Scrapbook Kit, FIVESTARTCARD for the Card kit, and FIVESTARTPL for the PL kit. Just add the Far Far Away subscription you love to your cart along with the corresponding promo code, and you're set!
As a bonus, one new subscriber will be randomly selected to receive a FREE 12-month subscription!
Offer expires 1/26/15 at 11:59pm EST and requires a 6 month commitment. Add the Far Far Away kit to your cart and the corresponding promo code.

Or perhaps you're interested in the latest classes? The excitement is certainly building for Marcy Penner's On The Grid class, the sneaks on Instagram have been insane! 


Marcy Penner shares her secrets for using a grid based design to create perfectly pulled together projects in a flash. You'll get Marcy's expertise in multiple areas to create the perfect base for your projects by exploring using basic grids, playing with design through the use of tags and other materials, and getting out of the square format by experimenting with other shapes or stamps.


While supplies last, On the Grid students will receive a bonus class kit containing enamel dots, die cuts, stickers and 2 veneer grids. This kit will ship for free, no matter where you are. Anything that you order along with the class will be held and shipped with the kit. Suggested class supplies can be found here in the shop.

Registration has already begun, and class starts on February 2nd. Register here.

Well that's it for now. I'll be back real soon with a few projects to share!

Photobucket

Monday, January 12, 2015

2014 Not-Quite-a-December-Daily

Given my 2013 Not-Quite-a-December-Daily album took over a year to put together, I decided to seriously rethink my approach. Not that I didn't thoroughly enjoy the process, or that I'm disappointed in the final product - those two statements couldn't be further from the truth. It's just that, you know, for someone who likes to be organised, taking 13 months to complete a project is just not my style!

So here's the someone genius plan I devised for my 2014 album....
I simply combined all the other Christmas projects I had completed for other 'assignments' and attached some photo collages I whipped up in the Project Life app on my phone whilst on the go! That meant there was barely any new work that went into this after Christmas was finished. And that's why it's already finished!

Let me show you what I mean:
The base of the album is the cards I created for the 12 Studio Calico Kits of Christmas project I shared as part of the Papercut Labs Blog Hop.
I intermittently strung some of the tags I created for the girls Rainbow Christmas Bags to serve as sort of bookmarks.
And I tied the whole thing together with some leftover Christmas Stamped Ribbon!!


Will I do it this way again next year? Don't know. Each of my albums is completely different from year to year and I don't mind that. What I'm most happy about with this version is the amount of story I was able to include, and having written it as the month progressed means that it's full of accurate detail. I can't necessarily say that about an album I finish a year later ;-) So I think I might keep the digital aspect of it. But I guess only time will tell how it will actually look this year.

Until then,
Happy Scrapping!
xx

Photobucket

Thursday, January 8, 2015

Handbook Stamp Organisation

Last year I introduced you to some of my stamp storage solutions. I showed you how I keep my rubber stamps in a fishbowl and my acrylic stamps mounted on plastic panels in a folder. But as I keep on accumulating more and more stamps I need to decide whether I'm sticking with the same system or whether I try something new. Some of the Studio Calico girls demonstrated how they keep theirs in a Handbook and I figured that was definitely worth a go. So let me show you how I've organised mine.


I have one of the 'old' Handbooks. Studio Calico are just about to release their new model but it's not on the shelves yet. I'm looking forward to checking them out given I've completely filled this one up and I'm thinking this is the new direction for me. In this one Handbook I have managed to store every single acrylic stamp set I've received in my Studio Calico kits and classes over the past year. Trust me... that's a LOT! I'm not going to show them all here, and I haven't counted, but we're talking about an average of 5 sets a month for 12 months!


In general terms the stamp sets come in only a handful of sizes, and the Handbook page protectors only come in a handful of sizes so my goal was to figure out which stamps were going to fit in which protectors. Some were obvious because they were both exactly the same size, such as the 2x2" pockets above, and the 6x8" pockets below.


It's mainly the alpha sets that come in the 6x8" size, and these two are amongst my favourites. You can see here the 'So Fancy' set and the 'Kit' alpha. These easily slipped into the pockets, and even though the backing paper hangs out the top just a smidge I don't mind.


The 4x6" sets didn't cause too much of a challenge either, as again there are matching 4x6" plastic pockets available. The openings are at the top which means the stamps fit in sideways.


What I had to do to make them fit though was to slightly trim down the backing paper so it was the same size as the stamps. I trimmed the bottom off so that the title (and designer if it's included) is still visible. Then these slip easily into the pockets.


Once again, the 3x4" stamp sets were easily stored in the corresponding pockets, and likewise I had to trim down the backing paper marginally so they would fit in. Occasionally during my time as a Studio Calico Creative Team member the stamp sets were shipped to us without any packaging, and on those occasions I just used a scrap piece of paper (left over from a watercolour experiment) as my backing paper so they were still easily visible. 


But this is where we reach the stage where the stamp set size doesn't exactly match a specific pocket size and I had to work out what I was going to do. Firstly, there are quite a few 1x6" stamp sets in my possession and I ended up stacking 4 of these on top of one another into a 4x6" pocket. You can see what I mean in the picture above. This is slightly problematic because the only way to reach the stamp set down the bottom is to take out the other 3 sets first. So it's a bit fiddly. But I couldn't figure out any other solution.


And the last very common size of stamps are the 2x3" sets. What I did here was to use a plastic sleeve that started off as two 4x6" pockets and run it through my sewing machine to sew vertical lines at the 2" and 4" mark. That divided the pockets into 2x3" sizes and I can now store six sets on this one page.

Well I hope all that makes sense? If you have any questions about what I've done, or about any of the fabulous stamp sets you can see here then please ask!

Photobucket

Monday, January 5, 2015

My very-late and not-quite a December Daily

Oh yeah, I'm well aware of what year it is! But the honest truth is I've only just finished my 2013 December Daily and rather than feeling ashamed that it's taken this long, I'm rather chuffed that it's actually done. Late and done is better than not finished at all in my opinion ;-)


So forgive me whilst I share what I've accomplished!


Filled with plenty of photos, heaps of kid-art (I let the kids draw a picture whenever they felt inclined), a truck-load of ephemera from the season (tags from presents and Christmas cards galore) and decorated with whatever I had at hand (lots of Kellie Stamps and Studio Calico). I made sure to document the story thoroughly as I went along too.

Do you want to know what the most ironic thing is?
It might have taken me a year to finish this album, but doing so inspired me to get my 2014 album done at the same time and I can confirm that one's pretty much done as well! I've taken a completely different approach and it was much easier. Lesson learned!

I'll share that one soon ;-)

Photobucket

LinkWithin

Related Posts with Thumbnails