Pages

Monday, July 27, 2015

Moriah's March and April pages

Easter fell in March this year but I knew I was already going to dedicate a whole 'nother spread to that celebration, so instead I went ahead and made Moriah's March page without direct reference to it. However it still seems so Eastery to me. I think mainly because of the bright pastel colours I used that remind me of Easter eggs.
Is there such a thing as bright pastels? Oh well... you know what I mean!


I started building up the foundations of this page with my Studio Calico Galileo PL Kit, and snuck in one of my #100dayproject cards as well. But as for the embellishments, for those I turned to a bunch of Pink Fresh Studio bits and pieces. The colours matched so well, and are totally me.


Thinking of Easter gave me the perfect excuse (in my own mind) to use one of those Studio Calico moon papers that came in the matching 4x6" paper pad for the Galileo kit. The timing of Easter being dependent on the full moon was why it made sense to me.


And yeah, I even got as organised as to type my journaling up on the typewriter this time too. I do love the look of it - much neater of course. But it takes a bit more effort, and then it lacks the handwritten touch which I'm sure my kids will come to appreciate in time. As long as they can read it!


My April page went almost entirely in the opposite direction though. By that I mean I made all the cards in this spread (apart from the two with the small photos) and the colour scheme is quite quite different.


There's much more memorabilia in this spread too. The title card is actually a thank-you card I was given that I then just sewed 'April' over the top of. The graduation tickets are tucked behind the first photo, and then there's two drawings Moriah did that I scanned in and shrunk down to fit into the pockets.


I got a little clever with one of them. Let me show you...


When I shared this drawing Moriah did of all these detailed relief lines on Instagram I had lots of respondents who stated they could see hidden pictures within it. So cool! I've created a bit of a layered thing here to explain it. The top layer is clear plastic and just has the number stickers on it. Under that is the miniature drawing. Then under that is the hidden journaling with an explanation of what the numbers represent.


Catching up I am. Today I just posted the first sneak of Bethany's June page on Instagram. You can check it out here. I'm just a bit more behind posting them here on my blog. But I'm getting there hey!
Photobucket

Monday, July 20, 2015

Bethany's March and April pages

Despite early March being when Judah was born we still had a busy month with each of the girls as well, so there was plenty to fill their pages with.


I'd been hoarding the Studio Calico "My brain" card for a while now - it's totally awesome and I was tempted to save it forever, but I think it's even more awesome to actually get it into an album! The sentiment kinda fits the whole theme of the page, as I said, we were pretty busy in March. But it's really the rainbow colour scheme that drew me in for using it here.


The centre photos and the top right journaling pocket is all about Bethany's performances on Harmony Day which is a celebration of our multi-culturalism so the day was bright and fun. All the kids were encouraged to dress in their national costumes if they had one. Bethany decided she would dress in red, white and blue (the colours of our Australian flag) to represent her heritage and she had a speaking role in her class performance, as well as singing in the choir.


Another card I managed to slip in here was the collaborative one a few of us put together during a scrap date (that's what the Trophy Husband calls them). It was a fun exercise where we took a plain white card and added our own little touch before passing it to the next person to add something. 


For Bethany's April page I decided to try and use up lots of my Autumn cards as I'm making an effort to put the seasonal and themed cards in my collection to their proper use.


I made the title card from one of my 6x6" paper pads which is something I probably need to do more of as I have more than a few of them in my stash!


So I matched the book cards with the photo of her reading, printed out a small version of The Lion King poster to use next to the photo of them going to the performance, and used the Autumny journaling cards to record the story, even though it doesn't really have anything to do with Autumn ;-)


Feel free to ask any questions about my supplies or methods or photos if you're curious.
xx
Photobucket

Wednesday, July 15, 2015

Coffee coffee coffee

coffee coffee....
etc!


Is it wrong that I wanted a coffee after school pick up one day so I took all of them to our local cafe, ordered a cappuccino (and cake), chilled out and then thought "why not make this a family tradition" so we can do this all the time?


To be fair, the cafe provides card games, drawing materials and other fun stuff for the kids to do so we spend some quality time together. That's got to count for something right?
Plus.... they serve really good coffee.


Now we have a regular Monday afternoon coffee date that we all look forward to. And that deserves a Project Life layout all to itself don't you think?

PS. Every single one of those awesome coffee-orientated stamps comes from the latest Kellie Stamps set called (wait for it) 'Coffee'. You can order your set here. And the white alpha stamps? They're coming soon ;-)


Photobucket

Monday, July 13, 2015

Jot Mood Board challenge for July


If you take an overview of any of my online galleries you'll know that although I'm a lover of the entire spectrum of happy colours I tend to gravitate mostly towards pinks, yellows and aquas (and commonly putting them together). So it takes something spectacular to get me moving out of my comfort zone and heading for the orange and green. Probably something like this....


This month's Mood Board challenge at Jot Magazine is simply stunning. There's no argument there. It took a little bit of wrestling to get this card looking good enough to satisfy myself, but I really enjoyed the challenge. It's really satisfying to try something new and I always learn something along the way too.


As usual my supplies are pulled from old Studio Calico kits - I'm particularly in love with that scalloped background paper from the Office Hours Scrapbook Kit and I'm so happy to see it on a project at last.


I'm also in love with the prize on offer from Inkurable Artistry for this months challenge winner, makes me wish I could win it myself!

Check out all the details here.

Photobucket

Friday, July 10, 2015

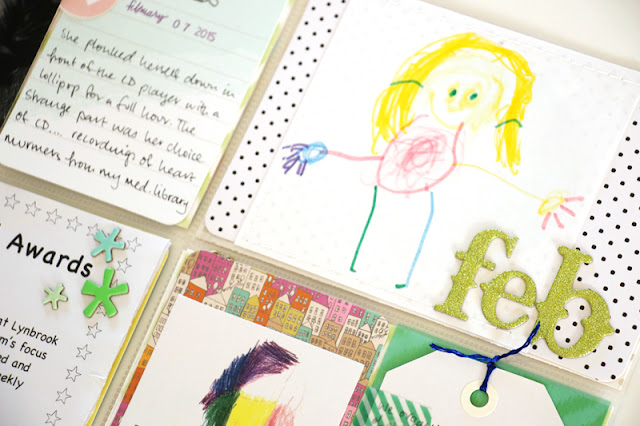
Moriah's Jan and Feb pages


Things I've learned via this process of catching up with Project Life....
1. All those month-specific embellishments in my Studio Calico kits that I thought weren't my thing (mainly because I find it so hard to scrapbook in the moment since I'm usually catching up on the past) are actually getting used now. And I love them! 


2. I'm finding a place to keep all those little bits of kid-art that are too pretty to throw away, but which seem to accumulate in ever-increasing piles. And I love that it helps tell the story of where they are at right now.


3. Instagram is my friend in this process. Most of the photos I use in my spreads were first posted there, so all I need to do is go back and see what I wrote at the time et voila... journaling done!


4. I want to include bright colours in all the spectrum of the rainbow in every spread. I can't help it!


5. Finding the balance between photos, kid-art, memorabilia, filler cards, journaling and my own cards from the 100 Day Project is hard, but I'm very happy when I think I've got it right!


6. Despite previous years declarations of never feeling drawn to do Project Life in a weekly way I can now understand why people do. I'm loving this!!

If you ever have any questions about what products I've used, or anything else you're wondering, don't hesitate to ask :-)

Photobucket

Thursday, July 9, 2015

Jot Kids Lego Challenge part 1

The girls have always loved getting involved with the Jot Kids challenges that are posted on the school holidays. And now that this year I'm a Jot Girl they've been privy to the inside info about what it's going to be, and are invited to take part like designers. They may have both squealed and done a little happy dance before knuckling down to create some pages!
The challenge for these holidays has been to use the Mood Board to spark some creative play with Lego, and then make a page about the experience too.


It was perfect timing for us as Moriah had already spent the last week working on her huge (17 pages worth of instructions) Lego Friends cafe before we even knew about the Jot Kids challenge. So it was obvious what she was going to scrap!


And here she is with her finished page. We stuck with the primary colours despite her Lego house being pink, but I think it works just the same. I let her loose with a couple of my old JBS kits which had all the right papers and she was able to quickly build up some layers like a pro!

Jot Kids Lego Challenge part 2

Bethany on the other hand, heard the word Lego and got all excited and built something with pretty much every set we own! We snapped some photos and she wanted to scrap them straight away. Once again we dove into my collection of old JBS kits I hadn't yet killed and she chose all these bright Glitz papers. What I love most of all though is all that journaling she wrote out by herself. Lots and lots of journaling describing what she'd built!


Depending on where you live the school holidays might be coming to an end or they might have only just started. Either way it doesn't matter because we've left the closing date as the 1st August so that it allows you plenty of time to let your kids get creative.


The prize has been donated by Anita from Flutterby Designs and she's always very generous with what she gives away. Your kids will love it - trust me!

You can get all the details about the Jot Kids competition here on the Jot blog.

Happy scrapping!
Photobucket

Wednesday, July 1, 2015

The Story of the Stamped Tea Towel

This is the story of a lovely project from The Makers' Box which I thought I could customise to suit my rainbow heart but which all went interestingly wrong!


It started off with the best of intentions. I had my project supplies all ready, I had my instructions read, and I had ideas of how I wanted to change it up. The original project takes you through a lovely stamped triangle design on a linen tea towel. Great instructions with troubleshooting advice to boot. A fabulous quick and easy project if you like monochrome. Which I do. But I love ROYGBIV more.


So arming myself with an array of reinkers I dampened my tea towel and set to work dropping and smooshing a combination of yellow, orange and pale pink onto it. But after I hung it in the sunshine to dry the strangest thing happened. Pretty much all the colour except for the darkest of orange spots faded away to nothing and I was left with an almost white tea towel again!


Now lets be honest, I did no research into this. I didn't use fabric dye, it's not even a permanent dye. I don't know if the tea towel was treated with something and I should have washed it first. I don't know if it was the sun that did the fading. All I know is I experimented with something new and it didn't quite work out as I imagined! But that's ok. What is creativity if not to try, fail, try something different and succeed?


So moving right along I added some darker colours next. Blue, green and mint. I also dropped on more pink and a touch of yellow. Once again when it dried I was left with just the blue and pink. What a mystery! Still, it's a bit pretty and I decided that was enough - on with the stamping!


I'm not naive enough to think I can actually use this now to dry my dishes. I'm pretty confident that if I washed this now all the colour would come out completely apart from the stamped triangles and I'm back at square one. I've actually moved it into my craft room and hung it on the end of my Raskog. If nothing else I can use it to wipe my painty hands on it - that might do the trick to keep some colour on it!


Something I had much greater success using my reinkers for was this great little art-meets-science activity I did with my girls last holidays. I wrote an article about creating with kids which you can read in Issue One of the Makers' Magazine. It's free and it's out now!

Photobucket

LinkWithin

Related Posts with Thumbnails