Welcome to the From Screen 2 Scrap blog-hop, and thanks for helping us celebrate our 1st birthday!
If you arrived here from the amazing Anne Patterson's blog then you're on the right track. If you've stumbled across this by accident then I encourage you to go back to the FS2S blog and start at the beginning - you won't be sorry!
To celebrate our birthday we've got a tonne of prizes to give away, but before we get to that I wanted to show you the layout I created inspired by the movie poster for Juno.
I used the movie poster much like a sketch and clustered my photo and embellishments in the corner, and then filled up the page with stripes. I've used Sassafras Apple Jack collection papers and banner flags (including the negatives from the sheet once I had removed the banner itself - nothing goes to waste here!) You can still find the Apple Jack collection papers in the Handmade by Suzanne store here, and they're even on sale at the moment! The word 'sweet' and the boy flying the kite are from the October Afternoon Fly a Kite sticker sheet which you can find here. But the flowers are all from Kitschy Digitals.
On first impressions it might appear as though my 'lollipops' title is made of traditional alpha stickers (at least from a distance anyway!) but it is handmade. I'll quickly run you through the process of how I did it. It's an easy way of customising your titles and getting quite a professional appearance.
1. Type your title in a Word document and choose a size and font that suits your layout. You can find a tonne of fun (and free!) fonts you can download at Kevin and Amanda's. Print it out on a scrap piece of paper.
2. Use some tracing paper (or just plain old baking paper!) to trace your title
3. And then transfer it onto the patterned paper you're going to use for your title. I'm using the yellow b-side from the Sassafras Apple Jack paper called "my type"
4. Use a black pen or texta to go over it. I use a calligraphy pen as an easy way of making sure that the letters aren't all the same thickness. If you look closely you'll see that each letter is thicker in some parts and thinner in others. This gives it a more professional appearance.
5. Then just cut around it - either use your craft knife (or scalpel as the case may be!) or your fine point scissors. Whatever you find easiest.
6. You can either stop there, or for even more details I then matted it on another contrasting colour and cut around that too. Plus I also added a few 'shadows' to my letters with a brown pen.
When I added it to my layout, I used foam tape to pop it off the page a little. And there you have it! It really is a quick and easy way to customise your titles. You can easily change the size, the font, the colour - anything goes!
Oh, and in case you're wondering why this layout is even called sweet lollipops, the journalling reads "While I was pregnant if anyone asked Bethany what the baby should be called she always answered 'Lollipops'!!" Strange but true :-)
Now onto the really good stuff!
I've got a $10 voucher (plus free shipping) to the Handmade by Suzanne store up for grabs! How sweet is that? I love that Suzanne throws in free shipping too so that you can spend the whole $10 on goodies!
In order to be in the running for the prize on my blog you simply have to sign up to be a follower and then leave me a comment. If you're already a follower you still need to comment to let me know you're playing along :-)
Your next stop on the hop is the incredible Julene Matthews.
Make sure you leave comments on all 10 Designers blogs and then check back at FS2S to leave your comment there to be in the running for the FS2S blog candy. Or check back there if you get lost along the way.
PS. If you enter a layout into the August Juno challenge you automatically get a free entry into each of the 10 Designers blog prizes. And if you do that and mention that you are a follower of my blog (and/or any of the other Designers blogs) then you get another free entry into their blog prize!! Soooo many reasons to enter :-)
Thanks for hopping with us!
Showing posts with label scrappiness. Show all posts
Sunday, August 8, 2010
Friday, August 6, 2010
Mega-Post
So I go back to work on Monday after having a year off.
It's quite a daunting prospect for so many reasons. Obviously the most important one being the change it's going to make to my family, but somewhere down on the list is the change it's going to make to my crafting ability and time. I say this as a way of explaining what may or may not happen to my blogging over the next few months. Basically..... I don't know.
I do know I will continue to scrap and craft. For a start I still have my Design Team commitments and I will continue to do these to the best of my ability. And I'm sure I will continue to scrap for myself as well. But it will just remain as to what amount of time I can dedicate to this. Certainly not (nearly) everyday as the case is at the moment. And I do have a back-log of projects that I can share with you over the coming weeks. Starting today.......
Grab a coffee and relax because this is going to be a mega-post (my way of making up for knowing I may be MIA for the next little bit. Apart from starting work on Monday I'm also moving house this weekend. I'm surrounded by boxes as we speak!)
I thought it was about time I showed you all those layouts I made with my first Studio Calico kit (June's Partly Sunny, and the add-on kit of which I can't remember it's name). I've already shared two of them, which you can check out here and here. But there's a few more :-)
I might not write a whole lot between pictures as otherwise this would get ridiculously long. But let me just say that on all these layouts I've used the kit products and nothing else. They are all a mixture of the main kit and the add-on I got. By the way, the main kit is still available to purchase in case you're interested!
I particularly loved the K&Co alphas and fabric embellishments that came in the add-on and I've used them on nearly all of my layouts I think!
I've had those Jenni Bowlin vintage buttons on my 'must buy' list for a while, so imagine how chuffed I was that I got both the white and the green buttons in the kit!
You'll also notice a lot of the photos I've used on all these layouts look the same too. That's because they're all from the same day at the park, snapping photos on the i-phone with the Hipstamatic app.
And did I mention the washi tape and how much I love it?!! A lot! And the add-on kit came with two rolls. That was another reason I needed the add-on (even though it cost more than the main kit!)
I had to think of something spectacular to do with that Buzz and Bloom chipboard piece. It's actually 12x12" so I cut it down a bit, and I'm really happy with how this layout turned out.
This lovely American Craft's Botanique paper has a really nice glittery finish on it so I wanted to showcase it on this layout. I like how it's all nice muted tones.
Wow. I thought I had only done 5 or 6 layouts from the kit. In doing this I realise I've done 8!! And I've still got enough left overs to do at least another two and easily another 4, although I would have to add some more cardstock and ration out my alphas. But I've got one piece of paper that's still intact and lots and lots of scraps and embellishments.
Anyway, I hope this will tide you over until I get back to regular blogging and crafting again. However, I don't think you'll notice any difference until at least September because I'm organised enough to have all the August stuff sorted out :-)
Alright ... I've got to get back to packing!
It's quite a daunting prospect for so many reasons. Obviously the most important one being the change it's going to make to my family, but somewhere down on the list is the change it's going to make to my crafting ability and time. I say this as a way of explaining what may or may not happen to my blogging over the next few months. Basically..... I don't know.
I do know I will continue to scrap and craft. For a start I still have my Design Team commitments and I will continue to do these to the best of my ability. And I'm sure I will continue to scrap for myself as well. But it will just remain as to what amount of time I can dedicate to this. Certainly not (nearly) everyday as the case is at the moment. And I do have a back-log of projects that I can share with you over the coming weeks. Starting today.......
Grab a coffee and relax because this is going to be a mega-post (my way of making up for knowing I may be MIA for the next little bit. Apart from starting work on Monday I'm also moving house this weekend. I'm surrounded by boxes as we speak!)
I thought it was about time I showed you all those layouts I made with my first Studio Calico kit (June's Partly Sunny, and the add-on kit of which I can't remember it's name). I've already shared two of them, which you can check out here and here. But there's a few more :-)
I might not write a whole lot between pictures as otherwise this would get ridiculously long. But let me just say that on all these layouts I've used the kit products and nothing else. They are all a mixture of the main kit and the add-on I got. By the way, the main kit is still available to purchase in case you're interested!
I particularly loved the K&Co alphas and fabric embellishments that came in the add-on and I've used them on nearly all of my layouts I think!
I've had those Jenni Bowlin vintage buttons on my 'must buy' list for a while, so imagine how chuffed I was that I got both the white and the green buttons in the kit!
You'll also notice a lot of the photos I've used on all these layouts look the same too. That's because they're all from the same day at the park, snapping photos on the i-phone with the Hipstamatic app.
And did I mention the washi tape and how much I love it?!! A lot! And the add-on kit came with two rolls. That was another reason I needed the add-on (even though it cost more than the main kit!)
I had to think of something spectacular to do with that Buzz and Bloom chipboard piece. It's actually 12x12" so I cut it down a bit, and I'm really happy with how this layout turned out.
This lovely American Craft's Botanique paper has a really nice glittery finish on it so I wanted to showcase it on this layout. I like how it's all nice muted tones.
Wow. I thought I had only done 5 or 6 layouts from the kit. In doing this I realise I've done 8!! And I've still got enough left overs to do at least another two and easily another 4, although I would have to add some more cardstock and ration out my alphas. But I've got one piece of paper that's still intact and lots and lots of scraps and embellishments.
Anyway, I hope this will tide you over until I get back to regular blogging and crafting again. However, I don't think you'll notice any difference until at least September because I'm organised enough to have all the August stuff sorted out :-)
Alright ... I've got to get back to packing!
Wednesday, August 4, 2010
I'm a Kreator!!
I was over the moon when Keandra asked me to be a Kontributing Kreator this month at Kreatorville Krafts. You may have noticed I have mentioned her fantastic kits once or twice (!!!!) and of course, then there was Kreatorville Week (+1) here on my blog last month.
(firstly, let me say that Keandra had already asked me to be a Guest Designer long before I dedicated a week to her awesome kit klub)
So my first order of business was to design an introduction page, a layout with my very own bobble-head. I was ecstatic!! I mean, how much fun is it to get your own personalised bobble-head! (You can order your own through Aptly Titled if you want). When Keandra told me it was going to be about 8 inches high I thought, "oh good, so it's life-sized" ('cos I'm only 5 foot 2" standing on my toes - lucky she gave me those platform heels!)
And I was allowed to say whatever I wanted about myself. Well it turns out I wanted to say a lot!
To create the base for my layout I first smeared on a thin layer of gesso all over my patterned paper (from the March kit). And I do mean smeared..... I used my hands :-) Then I took out my trusty stencil (that I showed you how to make here) and did lots of layers with Glimmermist. That gave me a good base to add all my journalling on.
I doodled in this vine with my black pen and painted it with some acrylic paint before adding the leaves (cut from the ribbon in the March kit) and the flowers (cut from a paper in the November kit) and blinging them up with some jewels (from the March kit).
I also used the same technique for the border all around the page.
I added a few titles with letter stickers (from the March and April kits) and interspersed my handwriting with some rub-on words (from the April and June kits). The main title was created with chipboard alphas on some patterned papers (all from the May kit).
I loved these lanterns from the paper in the June kit so I hung them up with the twine from the May kit.
You can surely see I've given my past kits a good work-out, but you'll have to wait a little longer to see what I've done with the amazing August kit. In the meantime, can you guess what the 'secret technique' is for August? I've used it a few times on this layout. Pop on over to Kreatorville for a few more hints.
(firstly, let me say that Keandra had already asked me to be a Guest Designer long before I dedicated a week to her awesome kit klub)
So my first order of business was to design an introduction page, a layout with my very own bobble-head. I was ecstatic!! I mean, how much fun is it to get your own personalised bobble-head! (You can order your own through Aptly Titled if you want). When Keandra told me it was going to be about 8 inches high I thought, "oh good, so it's life-sized" ('cos I'm only 5 foot 2" standing on my toes - lucky she gave me those platform heels!)
And I was allowed to say whatever I wanted about myself. Well it turns out I wanted to say a lot!
To create the base for my layout I first smeared on a thin layer of gesso all over my patterned paper (from the March kit). And I do mean smeared..... I used my hands :-) Then I took out my trusty stencil (that I showed you how to make here) and did lots of layers with Glimmermist. That gave me a good base to add all my journalling on.
I doodled in this vine with my black pen and painted it with some acrylic paint before adding the leaves (cut from the ribbon in the March kit) and the flowers (cut from a paper in the November kit) and blinging them up with some jewels (from the March kit).
I also used the same technique for the border all around the page.
I added a few titles with letter stickers (from the March and April kits) and interspersed my handwriting with some rub-on words (from the April and June kits). The main title was created with chipboard alphas on some patterned papers (all from the May kit).
I loved these lanterns from the paper in the June kit so I hung them up with the twine from the May kit.
You can surely see I've given my past kits a good work-out, but you'll have to wait a little longer to see what I've done with the amazing August kit. In the meantime, can you guess what the 'secret technique' is for August? I've used it a few times on this layout. Pop on over to Kreatorville for a few more hints.
Tuesday, August 3, 2010
My Sweet Girl
Another month, another wonderful sketch challenge at Handmade by Suzanne. I had so much fun designing the sketch for last month's challenge that I decided to have another go :-)
So here's the sketch I drew:
And to test it out, I did my own example layout with the beautiful new Olivia collection from Basic Grey:
Now I know it looks like I've used every paper in the collection on this layout, but I haven't really I promise! Let me break it down for you.....
At the very top is one of the divine Basic Grey doilies (it's actually from the Green at Heart collection). I simply cut the edge off it for this layout. I know I'm always going on about how I love to use my stash instead of hoarding it, but I'm also a believer in spreading around the goodness. I mean, if you're going to buy one of the BG doilies which as we know are on the more expensive side, then I say - cut it up so you can use it on lots of layouts and get your money's worth!
All the flowers and 'leaves' and cute little animals are fussy-cut from one piece of paper called Kembrie, and the rest of the paper strips are cut from Sydney and Chloe. You really get great value from these papers because both sides are so beautiful. The pink ribbon I've used was a left-over from last month's supply of Fancy Pants goodness. It's from the Roadshow collection, but it matched perfectly :-)
I also added a bunch of the 4mm half pearls to my page. I used 'pale green' and 'sky' in all the centres of my flowers. I think it gives it a whole new layer of texture and shine. And since you get well over 100 pearls in every packet, even though I've used lots of them on every single one of my 5 layouts I've made from my kit so far, I've barely made a dent in them.
So I hope you'll give this month's sketch a go. There's a $20 voucher up for grabs. And pop on over to the gallery because I just know the girls are going to rock it again and there's bound to be lots of eye-candy for your inspiration. Not to mention we have a super-fantastic-amazing-internationally acclaimed Guest Designer this month. I'm not telling you who, you'll have to go over and check it out!!
So here's the sketch I drew:
And to test it out, I did my own example layout with the beautiful new Olivia collection from Basic Grey:
Now I know it looks like I've used every paper in the collection on this layout, but I haven't really I promise! Let me break it down for you.....
At the very top is one of the divine Basic Grey doilies (it's actually from the Green at Heart collection). I simply cut the edge off it for this layout. I know I'm always going on about how I love to use my stash instead of hoarding it, but I'm also a believer in spreading around the goodness. I mean, if you're going to buy one of the BG doilies which as we know are on the more expensive side, then I say - cut it up so you can use it on lots of layouts and get your money's worth!
All the flowers and 'leaves' and cute little animals are fussy-cut from one piece of paper called Kembrie, and the rest of the paper strips are cut from Sydney and Chloe. You really get great value from these papers because both sides are so beautiful. The pink ribbon I've used was a left-over from last month's supply of Fancy Pants goodness. It's from the Roadshow collection, but it matched perfectly :-)
I also added a bunch of the 4mm half pearls to my page. I used 'pale green' and 'sky' in all the centres of my flowers. I think it gives it a whole new layer of texture and shine. And since you get well over 100 pearls in every packet, even though I've used lots of them on every single one of my 5 layouts I've made from my kit so far, I've barely made a dent in them.
So I hope you'll give this month's sketch a go. There's a $20 voucher up for grabs. And pop on over to the gallery because I just know the girls are going to rock it again and there's bound to be lots of eye-candy for your inspiration. Not to mention we have a super-fantastic-amazing-internationally acclaimed Guest Designer this month. I'm not telling you who, you'll have to go over and check it out!!
Sunday, August 1, 2010
Make the world a cuter place
What's the only thing better than a banner?
(that's a trick question)
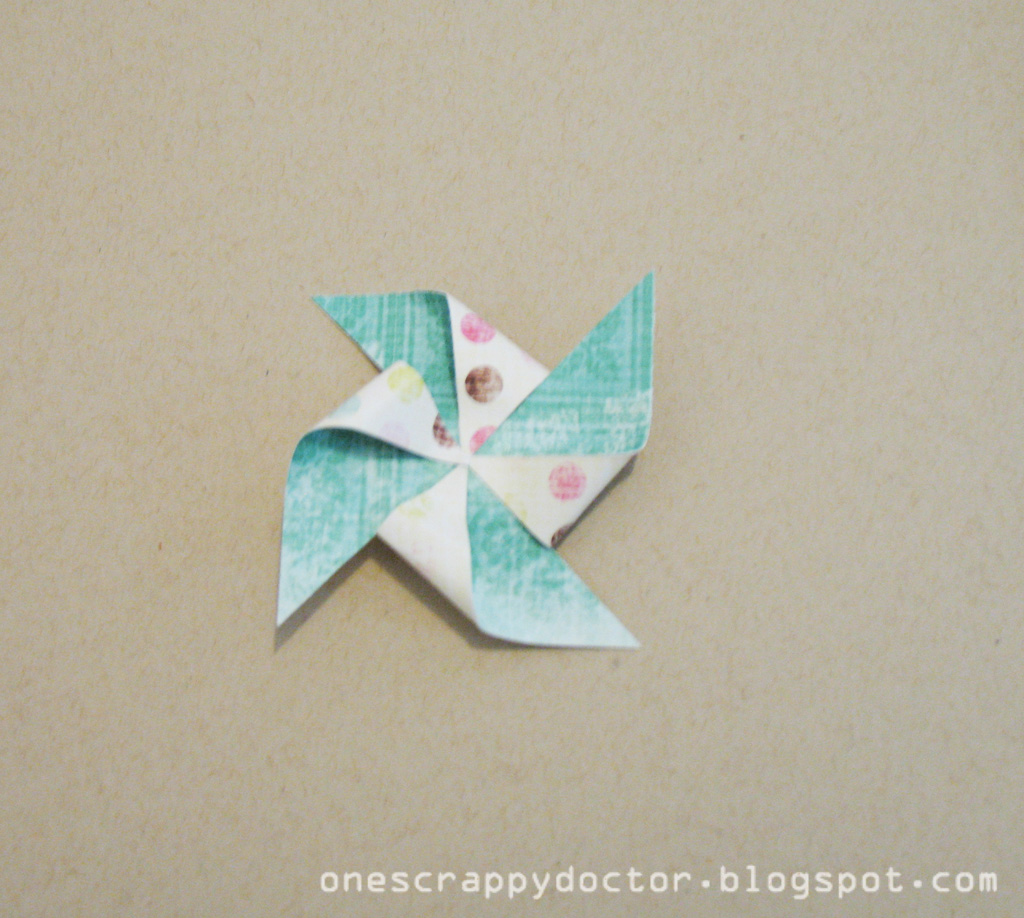
The only thing better than a banner is adding another fun element alongside it...... the pinwheel!!
They seem made for one another. They just ooze fun and frivolity and whimsy, and were perfect for this layout I did for Scrapbooking from Scratch.
They're really easy to make too. Let me show you.....
Step 1: Cut a square from a scrap piece of paper. This one is approximately 2 x 2" You can choose to get all perfect and particular and measure it and cut it with your paper-trimmer, or you can choose to throw caution to the wind (aka. my style) and cut it freehand. It's very forgiving :-)
Step 2: Cut diagonally in from each corner towards the centre. But stop before you cut all the way across your paper (too easy to do let me assure you!!)
Step 3: You can't see in the picture but I've stuck a little square of double-sided tape in the centre to which all of my 'blades' will stick to. So all you do is fold one corner from every triangle in towards the middle and stick it down.
Step 4: Repeat with each corner. You'll need to secure the centre otherwise they'll start flicking back up again. A brad is the perfect solution for this.
See, I told you this was easy :-)
Step 5: You can choose to leave them just like it is in step 4 (plus a brad) or go the extra level and layer a smaller pinwheel on top before adding your brad like I've done in this example.
Either way I think they look fabulous and they added the right amount of extra texture and dimension to this layout. If you wanted to get really tricky you could pin them to your layout with the same brad so that they might even spin around like a proper pinwheel. I figure there won't be much spinning once this baby gets inside a plastic sleeve and stuck in an album :-)
Yes, that's my girl.... making the world cuter one smile at a time.
All the products in this layout (except the brads) were made with the July kit from Scrapbooking from Scratch. The papers are mainly Fancy Pants Wishful Thinking, with one My Mind's Eye paper thrown in for good measure. Beautiful Blush Foam Thickers and some ribbon.
Many thanks to Peta for having me as a Guest DT for Scrapbooking from Scratch in July. I had so much fun playing with this gorgeous kit and I really love the projects I was able to make from it. I ended up with three layouts and a mini-album which I think proves what fabulous value it is. All I've got left is about 2 inches of scrap paper and a couple of random stickers! I'd seriously think about picking up that last kit if I were you!
(that's a trick question)
The only thing better than a banner is adding another fun element alongside it...... the pinwheel!!
They seem made for one another. They just ooze fun and frivolity and whimsy, and were perfect for this layout I did for Scrapbooking from Scratch.
They're really easy to make too. Let me show you.....
Step 1: Cut a square from a scrap piece of paper. This one is approximately 2 x 2" You can choose to get all perfect and particular and measure it and cut it with your paper-trimmer, or you can choose to throw caution to the wind (aka. my style) and cut it freehand. It's very forgiving :-)
Step 2: Cut diagonally in from each corner towards the centre. But stop before you cut all the way across your paper (too easy to do let me assure you!!)
Step 3: You can't see in the picture but I've stuck a little square of double-sided tape in the centre to which all of my 'blades' will stick to. So all you do is fold one corner from every triangle in towards the middle and stick it down.
Step 4: Repeat with each corner. You'll need to secure the centre otherwise they'll start flicking back up again. A brad is the perfect solution for this.
See, I told you this was easy :-)
Step 5: You can choose to leave them just like it is in step 4 (plus a brad) or go the extra level and layer a smaller pinwheel on top before adding your brad like I've done in this example.
Either way I think they look fabulous and they added the right amount of extra texture and dimension to this layout. If you wanted to get really tricky you could pin them to your layout with the same brad so that they might even spin around like a proper pinwheel. I figure there won't be much spinning once this baby gets inside a plastic sleeve and stuck in an album :-)
Yes, that's my girl.... making the world cuter one smile at a time.
All the products in this layout (except the brads) were made with the July kit from Scrapbooking from Scratch. The papers are mainly Fancy Pants Wishful Thinking, with one My Mind's Eye paper thrown in for good measure. Beautiful Blush Foam Thickers and some ribbon.
Many thanks to Peta for having me as a Guest DT for Scrapbooking from Scratch in July. I had so much fun playing with this gorgeous kit and I really love the projects I was able to make from it. I ended up with three layouts and a mini-album which I think proves what fabulous value it is. All I've got left is about 2 inches of scrap paper and a couple of random stickers! I'd seriously think about picking up that last kit if I were you!
Friday, July 30, 2010
I'm Not a Chatterbox
Do you think it's cheating in a way if I use my July kit from Scrapbooking from Scratch, which was provided to me as the Guest Designer, to make one of my monthly Year in the Chair layouts? I mean, this is something I do every month for myself regardless of product, is it wrong to use the lovely Fancy Pants and My Mind's Eye kit? I hope not, because I did it already :-)
Everything on this page (apart from the Studio Calico 'June' stamp) is from the kit, and it was just perfect for my photo. Girly and fun and delicious! There's more of those banners. I'm pretty sure I used them on every one of my pages I created. You can see I layered a couple over the actual paper to create some dimension on the page. It was by pure fluke and coincidence that I had already fussy cut lots of strings of the banners, and that this one matched up with the underlying banner on the page.
And check out those Thickers too. They were just divine. Despite having two girls I hardly ever seem to buy pink alphas, but this has won me over big-time! The pale pink 'Blush' foam Thickers were just the right colour for these papers, and worked wonderfully with both the kraft and white cardstock that came in the kit.
I put my Heidi Swapp Edge Distressor to good use on this page..... and my sewing machine! There doesn't seem to be a layout that passes my desk without getting a run on the sewing machine these days. (Except ironically for a layout I did yesterday about my old sewing machine - but I'll save that for another day!)
And see the edges of the kraft cardstock? I used one of the stencils I showed you how to make in the last post and inked all around the edges. I'm not entirely sure about the end result.... but hey, it's interesting. And you know I can never leave anything well enough alone :-)
If you want to pick up one of these fabulous kits for yourself you better get your skates on because there is only one left. But don't worry, even if you miss out on this kit - check out the massive sale Peta is having on lots of the past kits at the moment. Gotta make way for CHA!
I've got one more project left to show you from my July kit. And yes, I'm saving the best for last :-)
Everything on this page (apart from the Studio Calico 'June' stamp) is from the kit, and it was just perfect for my photo. Girly and fun and delicious! There's more of those banners. I'm pretty sure I used them on every one of my pages I created. You can see I layered a couple over the actual paper to create some dimension on the page. It was by pure fluke and coincidence that I had already fussy cut lots of strings of the banners, and that this one matched up with the underlying banner on the page.
And check out those Thickers too. They were just divine. Despite having two girls I hardly ever seem to buy pink alphas, but this has won me over big-time! The pale pink 'Blush' foam Thickers were just the right colour for these papers, and worked wonderfully with both the kraft and white cardstock that came in the kit.
I put my Heidi Swapp Edge Distressor to good use on this page..... and my sewing machine! There doesn't seem to be a layout that passes my desk without getting a run on the sewing machine these days. (Except ironically for a layout I did yesterday about my old sewing machine - but I'll save that for another day!)
And see the edges of the kraft cardstock? I used one of the stencils I showed you how to make in the last post and inked all around the edges. I'm not entirely sure about the end result.... but hey, it's interesting. And you know I can never leave anything well enough alone :-)
If you want to pick up one of these fabulous kits for yourself you better get your skates on because there is only one left. But don't worry, even if you miss out on this kit - check out the massive sale Peta is having on lots of the past kits at the moment. Gotta make way for CHA!
I've got one more project left to show you from my July kit. And yes, I'm saving the best for last :-)
Tuesday, July 27, 2010
There Was a Little Girl
Just popping in quickly (I feel too sick otherwise) to show you the first layout I created for Scrapbooking from Scratch.
The July kit is really gorgeous. It's filled with Fancy Pants Wishful Thinking mixed with My Mind's Eye Quite Contrary Little Miss Muffet. And I love it!!!
For a start, do you see the bunting? It's all cut from one of the FP patterned papers in the kit. As soon as I saw it I knew it wasn't going to stay as a square sheet..... it was destined for fussy-cutting!!
Then there was some fun tickets and embellishments which are all from My Mind's Eye. I'm so into tickets right now. I surprised myself by only including one of them on this layout (don't worry, you'll see where the rest went later!)
Quick, only two kits left............
:-)
The July kit is really gorgeous. It's filled with Fancy Pants Wishful Thinking mixed with My Mind's Eye Quite Contrary Little Miss Muffet. And I love it!!!
For a start, do you see the bunting? It's all cut from one of the FP patterned papers in the kit. As soon as I saw it I knew it wasn't going to stay as a square sheet..... it was destined for fussy-cutting!!
Then there was some fun tickets and embellishments which are all from My Mind's Eye. I'm so into tickets right now. I surprised myself by only including one of them on this layout (don't worry, you'll see where the rest went later!)
Quick, only two kits left............
:-)
Subscribe to:
Posts (Atom)