Pages

Monday, November 18, 2013

The Story of the Strawberry Milkshake

I woke up to some extraordinary scrappy news today. The kind that brings a little squeal of excitement. But of course, I can't share it yet. Sorry! What I can tell you is that I'm also very excited about having another opportunity to be a Guest Designer for Scrap Friends' November Colour Challenge. Here's what I created...


Man was this colour challenge a little out of my comfort zone!! All those dark colours? Eeek! I tend to be either a brights or a pastels type of girl! I have to admit I had a mini-breakdown when I saw the colour palette because my mind just went blank as to what to do with it.

After I gathered myself I did what I always do with colour challenges and that's to start going through my stash and pulling out bits and pieces that match the colours. I don't think about collections, or what's going to match with what. I just want the right colours.


Often I find some real gems of forgotten products that probably wouldn't have seen the light of day otherwise. Like these Cosmo Cricket peacock feather stickers that have been in my collection for well over a year now (possible even 2) waiting for the perfect project. Today was their lucky day! They ended up becoming the real star of this layout don't you think?


I mixed in a few new products too, like the transparent Basic Grey die-cuts and Evalicious Stickers. And do you see that there on my page? Yes folks.... that's a flower! I did it! I managed to use a flower on my layout. So proud of myself!


The photo choice almost came last as I needed something that would match all these dark colours. This one of Miss M sipping on a strawberry milkshake suited perfectly. The fact that her polka-dot dress coordinated with the dark polka-dot paper actually came as a bit of a coincidence but I definitely embraced it :-) I used the photo to then prompt my title and journaling direction and made it into a list of her favourite foods right now. Nothing world-shattering but still a snapshot in time that will be worthwhile remembering later.

If you want to play along with the challenge there's a store voucher up for grabs for the winner. Find all the details on the Scrap Friends blog here.

Photobucket

Saturday, November 16, 2013

Scrapbook Creations Issue 102


is on sale now.... and it seems I've managed to score myself another cover! Always such a surprise and amazing compliment. Geez listen to me... like I have covers all the time! I certainly don't! This is only the second time, and I'm also sharing the honour with a few other people. Can you guess which project is mine?


It's the Christmas tree centrepiece ;-) And here's another little sneak peak of it up close.


If you're a regular subscriber to this magazine you're going to notice quite a few changes in the format this time around. Editor Ellen continues to do amazing things, and one of changes includes making the gallery layouts into full double-page spreads. That allows plenty of detail shots to be included too which I think gives you so much more perspective into the texture and dimension of the piece. Here's an example of what I mean....


I was lucky enough to have one of my layouts featured and this is one of the amazing detail shots taken by the talented Amanda Reddicliffe that appears in the magazine. I'm kinda impressed myself looking at this!! LOL!

There's plenty of other new features too. I suggest checking out the Christmas Issue for yourself on the Scrapbook Creations blog :-)

Photobucket

Friday, November 15, 2013

The Story of the Busy Christmas

Did you know Jennifer also has 4 challenges going on (with fabulous prizes involved!) as part of her Frosty Festivities? Be quick though because they close on the 17th ;-)


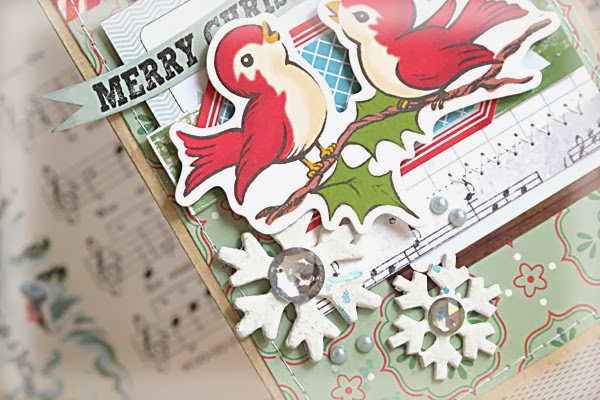
I've been able to whip up this card for the "Embrace the Busy" challenge which is all about creating something with a busy photo, or busy patterned papers, or lots of busy embellishments. I'm personally a bit prone to the crafting symptom of not knowing when to stop so I figured this was the challenge for me! If I'm not quite happy with how something is looking I just keep on adding things hoping that will solve the problem. I very rarely ever take anything away ;-)


And that's what happened here. I began with a basic design of a couple of Evalicious tags over some lovely October Afternoon paper. That was obviously not going to be enough.
So I added the stamped sentiment (which is from Evalicious' new Dear Santa stamp set) and that was ok, but it still needed more. And that's where is started to go pear-shaped.
You see, I also tried to stamp onto the red tag but it was the wrong colour and it didn't stamp properly anyway. So I covered it up with the blue paper and stuck the birds over it to try and hide it all!!


Then came the snowflakes just because they were left-over from my last Christmas project. And the pearls and rhinestones to finish it all off because all cards need a bit of bling surely?!

So yeah... I think this card qualifies for the challenge "Embrace the Busy" don't you?

Photobucket

Wednesday, November 13, 2013

The Story of Shaking Your Groove Thing

Sometimes you've just got to keep it real.


Even when it includes making challenge layouts that revolve around cute little tooshes!

 
I'm loving the Jot Mood Board challenge with it's vibrant magenta and gold contrasting against the cream and white space. With these bold colours on a layout I knew I was going to have to be careful about my photo choice so that it didn't clash. I have to admit, I'm normally someone who chooses what papers they want to work with first, but on this occasion I started my layout by choosing my photos.


I picked this series of photos I took of the divine Miss M because of the skirt she's wearing (I thought it would match the magenta). First she posed for me, then she proceeded to tuck her wand into her 'pocket' so she could dance. It was the dancing that did it though because before I knew it she was turning her back on me and shaking her bottom in time to her song. She likes to bend over a bit for dramatic effect ;-)


In fact, she even has a little song that goes with this particular dance. It's very sophisticated and really just repeats the line "shake your bum-bum, shake your bum-bum" as she does her little wiggle. She knows she's being a bit rude so she tries to put on a funny voice (which granted... does make me giggle every single time) but which also has the effect of making her pronounce the word bum 'boom'. Now you understand both the title, and why I put a question mark under the cuteness sticker!


Because there were 4 photos in this series I thought about either including all of them spread out across my page or leaving some off altogether. I didn't really fancy either of those two options so I came up with a third. It involved turning them into a little mini-book of sorts and including the whole thing on my layout! I made each page out of vellum and included just a few embellishments so that when they were all stacked up on top of each other you could still catch a glimpse of what's underneath.


The other benefit that came with making a little mini-book was that it also gave me lots of room for journaling so I could try and explain these photos in a bit of depth without it taking over the whole page. I used every available space!


Yep, sometimes you've just got to keep it real.

Photobucket

Tuesday, November 12, 2013

The Story of the Dream Catcher card (and a winner!)

Hope you've been enjoying all the fun during the Frosty Festivities? It was awesome to be a part of the blog hop, thank you Jennifer! Don't forget that even though the giveaways might have ended you've still got time to enter the challenges. And of course I've got the winner of my October Afternoon goodies to announce. But you're going to have to wait until the end for that ;-)


Remember the set of Dream Catcher Tags I made and shared here? Notice any similarities? Well this was actually the card that inspired it all. I made this first, but not being happy with how the ribbons had to be cut short (or else the card wouldn't stand up) I had to come up with another solution. And that's why the tags were created instead!


I went with a very neutral colour scheme here. I seem to be doing that a lot lately! But added lots of texture via that gorgeous Manor House Creations flower, the buttons, lace and Prima butterflies. This card found a new owner on the weekend when I went to a very exciting birthday party. You might have seen the photos on my Instagram or Facebook with us dressed up as Superheroes (click on the links to see them)? That's because the theme was 'capes'! How fun right?!


Another person who should be excited is my winner!!
Congratulations go to.....
phaerygurl!!!!

Please email me your postal address and I'll get your prize sent to you ASAP!
Photobucket

Saturday, November 9, 2013

Frosty Festivities Blog Hop

Hello and welcome to the Frosty Festivities Blog Hop!


You should have arrived here from the talented MEGHANN'S blog, but if you've stumbled here by chance or have just got lost along the way then I suggest you head back to the beginning at Jennifer Grace Creates and start from there!

Today we're celebrating all things Christmassy and Wintery!
If you're anything like me you'll know that it's never too early to start thinking Christmas thoughts ;-)


I made this layout especially for the hop using the October Afternoon Make it Merry collection. It's a photo of my cute (and I think perhaps slightly jaundiced!) niece celebrating her first Christmas last year. She was barely 1 month old and needless to say didn't really appreciate the festivities going on around her.


Like all good blog hops, there's amazing prizes up for grabs! If you comment on all the blogs in the hop, finishing at Jennifer Grace Creates to let Jennifer know you've been all the way around, then you'll be in with a chance THIS GRAND PRIZE of Simple Stories December Documented and Elle’s Studio Noel items, worth over £28! All entries must be received by Monday the 11th of November at 10.59pm GMT.


But you can also win this PRIZE FROM ME today if you leave a comment here. And you'll score another entry if you're a follower of my blog (just let me know). Loving the October Afternoon Make it Merry collection as much as I do, I've got some extras for one lucky winner. One person will win this amazing 4x6" Rubber Stamp, buttons and the Little Flyers from me just for leaving a comment!


Your next stop along the hop is... the fabulous RIIKKA!!

PS. 
Just for you Julie.... here's a recent picture of my cute niece 1 year on. Ready to celebrate another Christmas in more style this year I think!


Photobucket

Thursday, November 7, 2013

The Story of the Best Day

So yeah.... I am just lllloooooovviiinnnggg the new Maggie Holmes Flea Market collection. Love the colours - pink and teal are my all time faves. And the gold features are such a highlight. I love the fresh funky vintage theme of it all. But sometimes you want your layout to look different from all the rest right? You want to put your individual spin on things and customise it just enough that people won't automatically go 'oh that looks like all the other Flea Market layouts'.
That's where a few simple mixed-media techniques can come in handy.


Now I know the term 'mixed-media' sends chills down some people's spines. It seems arty and funky and you need to do something fabulous with it or don't even try. But at the core of it all it just means using different mediums on your page apart from paper. When you break it down into the idea of using paint or stencils or stamping on your page then you probably realise you already do it!


And if you keep all your mixed-media techniques and tricks to the background then you don't even need to worry about destroying your pretty papers - which I know is the other concern we all have! Here I've taken a piece of Vanilla Cardstock and added gel-medium, gesso, stencils, mist, pen and paint. And then layered on the patterned paper and embellishments on top so they still shine.


Do you want to know one more secret about mixed-media? If you put down a layer of paint for example and it doesn't turn out quite like what you imagined.... then you cover it up with another layer of something else and you call it a technique! Oh yeah.. you'll see what I mean if you watch my video. I didn't like the orange swirls so I put a layer of gesso over the top. Then the gesso smudged everywhere so when it dried I outlined the design with pen. You think I planned it that way? No way!


So now you've heard me talk about it enough, sit back and watch the process happen...

  
Photobucket

Tuesday, November 5, 2013

The Story of Learning to Express Myself

A couple of weeks ago X-Press It Australia advertised on their Facebook page they were looking for a few people to test-drive their new products. Like any curious crafter I immediately applied and was lucky enough to be chosen!


X-Press It are best known for their adhesives and what I received was their new Wide and Extra-Fine Glue Markers (along with the original too). To be honest I've never really bothered with glue-pens before. I'm preferentially a tape-runner type of girl. I guess I like speed and no fuss. I'm also too impatient to wait for drying time, and I want my product to stay exactly where I place it. But turns out these Glue Markers are actually fabulous!! Truly!


In order to do a true product review I figured I needed to something to show off the 3 different widths of glue. I first started off testing them on a scrap piece of paper. I ruled some lines and then sprinkled them with glitter so I could actually see it. Mainly because the Extra Fine pen is so fine that I was convinced it wasn't working because I couldn't see it! But after sprinkling the glitter it stuck perfectly and my fears were relieved. You can see my test piece in the photo above.


That's when the genius of the moment struck me and I thought... why do anything more fancy than that? Ruled lines of glitter, fresh white cardstock and a handful of Basic Grey Hey Girl embellishments. My cards are simple, but (I think) still striking. And they show off the Glue Markers perfectly.


I made sure I used extra-fine glitter so it would stick even to the Extra-Fine Glue Marker, but still being convinced it would eventually fall off I sprayed the card with a gloss varnish to finish and seal it all in.


What I also learned while doing these cards was how fabulous the Glue Markers are going to be for my 'normal' scrapping. See at the bottom of my cards I've got that strip of coloured paper, and then the really thin Doodlebug Designs border strip? Normally to stick that on with my tape runner I would try and apply just a little bit because it would run over the sides and I would then have to try and tidy up the overlapping glue before sticking it down. That's why I'm always sewing things down with my machine. Yep, seriously.. that's how I work!


But talk about being super-easy to just run my Glue Marker along the entire length of the back of it without worrying about overflow and then knowing it was going to stick precisely in place. And as far as my other prejudices are concerned.... this stuff dries really quickly, and really strong too. In fact, now I have to be more careful with my scrapping because once it's down it's going to stay there!

In summary...
I'm really glad to have been given this opportunity by X-Press It to try out their Glue Markers because it's really opened my eyes to a new method of adhesion, and I'm sure these are now going to become a staple in my stash. You can see my review they posted on their blog here.

Photobucket

Sunday, November 3, 2013

The Story of My Confessions....

.... and the winner of the Evalicious giveaway will be posted below too!


Working as a doctor I get to do my fair share of night-shift stints. In fact, in some of my rotations I spend as much as 1/3 of my time rostered onto it. It's quite a different world, and it takes some getting used to. Anyone who does it will tell you their own little tricks for coping. My main staples include lots of coffee, plenty of carbohydrates and some fast-paced comedy entertainment (love 30 Rock!!)


Whilst that sounds like a bit of fun actually, there's also a down-side. It's socially isolating, patients (and even other staff) are more aggressive, I question myself constantly and worry more, I'm perpetually tired and often fall sick. However, I also tend to build better relationships with the other staff when we get the time to sit around and chat because we're much more honest with each other! And it's quite satisfying when everything goes well and you know you've played a vital role in that.


In making this layout I started off with a sheet of Flea Market Jenna paper. You know how I always like to have a border of contrasting colour around my layout? Well this paper already has one built-in! Then I chose some of the chalkboard elements from the Chipboard Stickers and Heirloom paper because I liked the idea of the black representing the 'dark side' of what I was journaling about, and it contrasts nicely against the other pastel colours.


On the other hand, I used the Vellum Gold Doily behind my photo to represent the sun coming up. After all, when you're on night duty that's what you're hanging out for. Seeing the sun rise is the promise that you're soon about to knock off and be able to crawl into your own bed! It's a mini victory every single morning!


I had a lot of comments on this layout that I shared when posting about the Evalicious Giveaway. Specifically, a lot of you were asking about the paper I used, or whether or not I had added the paint splashes/stiches/rubons in the background. The answer is no! All the white that you see is just part of the paper... fabulous isn't it? Makes it look like I had done a whole lot of work when I really hadn't!! It's by a (?French) company called ICC and whilst I can no longer find the exact one I've used here I can see only this one from the same collection that you can buy in Australia.  

Now onto the winner!! Sorry to keep you waiting!

So by random draw the winner is......
LEANNE!
Leanne, send me an email with your postal address and I'll get your prize off to you ASAP :-)

Have a good long-weekend Melbournians!

Photobucket

LinkWithin

Related Posts with Thumbnails