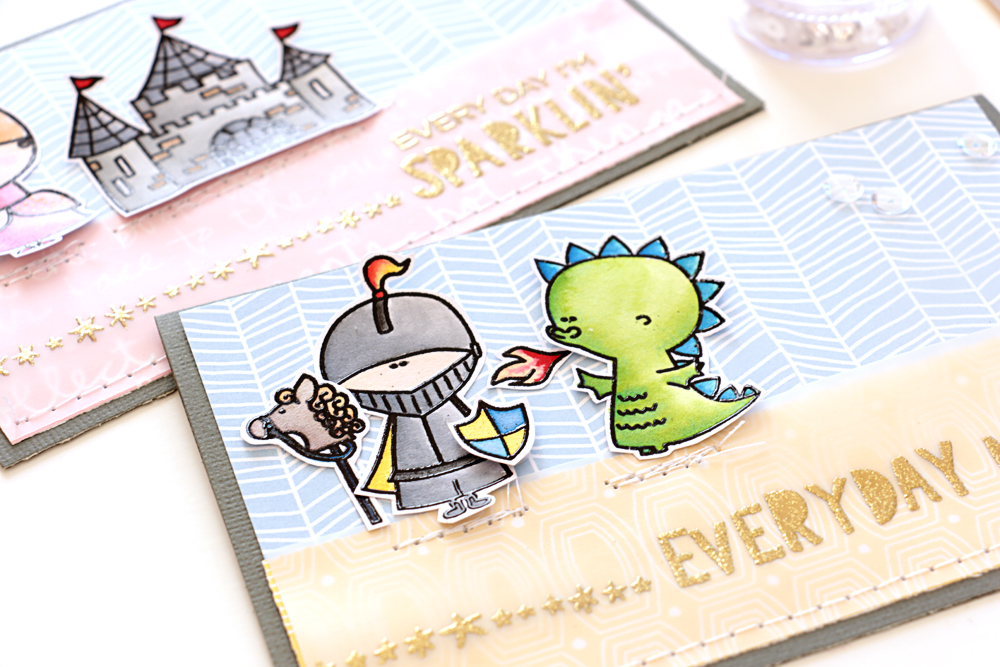
I am a little late to the party since World Cardmkaing Day was last Saturday, but you know what they say about better late than never right?!
In actual fact, the day itself slipped away from me before I even had time to catch my breath and think about making a card (one of those days!), but I followed along with the celebrations on social media, especially all the posts from Simon Says Stamp!, and as soon as I had a chance I ran to my craft room and whipped up this set of simple but cute cards.
I say simple, because I had already coloured all these fun images from the 'Castle Times' stamp set by Ink Blot Shop on another occasion, so I only had to make a background for them and assemble the cards together. But that still counts doesn't it?! LOL!
I chose to pair the images with some sentiments from the 'Everyday Magic' stamp set from Studio Calico - embossing them with gold glitter to fit with the magical fairy tale kind of theme I've got going on here.
Did you manage to play along with any challenges for World Cardmaking Day? I'd love to see. Link me up!!
Showing posts with label Studio Calico. Show all posts
Thursday, October 12, 2017
Saturday, September 30, 2017
Belly Shots and a bit of Labour!
It seems I didn't end up taking a whole lot of belly-shots this time around. But towards the end of my pregnancy I clearly thought I should remedy that and purposefully took a few. I was able to then fit them all onto one page in Shiloh's baby album!
I used a combination of ready-made cards from older Studio Calico Documenter kits, as well as a couple of cards I made myself from scraps of paper and a few embellishments. It was just the right balance of keeping the spread quick and simple, as well as still being a bit creative.
Oh, and of course, I needed to leave plenty of space for some journaling!
Keeping the album as chronological as possible (at least at this stage!) I then went on to create this page about the day she was born.
I started with some photos of the creative talents of my two eldest daughters as it related to my labour. Moriah made me a "happy pushing" card, and Bethany drew this fabulous picture of how she imagined the birth to go! They both made me laugh so much I needed to document their efforts!
That middle picture of me with the funny smile? That's totally in the middle of labour!
And then the more genuine smile of relief and amazement and love as I'm holding our new baby for the first time :-)
I used a combination of ready-made cards from older Studio Calico Documenter kits, as well as a couple of cards I made myself from scraps of paper and a few embellishments. It was just the right balance of keeping the spread quick and simple, as well as still being a bit creative.
Oh, and of course, I needed to leave plenty of space for some journaling!
Keeping the album as chronological as possible (at least at this stage!) I then went on to create this page about the day she was born.
I started with some photos of the creative talents of my two eldest daughters as it related to my labour. Moriah made me a "happy pushing" card, and Bethany drew this fabulous picture of how she imagined the birth to go! They both made me laugh so much I needed to document their efforts!
That middle picture of me with the funny smile? That's totally in the middle of labour!
And then the more genuine smile of relief and amazement and love as I'm holding our new baby for the first time :-)
So happy I'm getting these memories documented whilst they're still fairly new in my head!
Monday, September 25, 2017
Man Crush Monday
I have to admit, when I got the packet of wood veneer hashtags in a Studio Calico kit some time back, I had no idea what the #mcm meant! I totally had to Google it!
And once I knew, I actually didn't think I'd have any reason to use it. But then I caught sight of this picture of my dirt-covered snotty-nosed little Judah-bug and knew I'd found the perfect place to put it!!

For the record, there was also a #wcw in the packet as well... and despite using up quite a few of the other pieces on this spread I couldn't quite pretend to be that hip and use it as well!
Most of the cards and other embellishments on this spread though actually come from the May Documenter kit from Studio Calico called 'Alfresco'. It's such a favourite of mine. I have completely and utterly fallen in love with their kits again the last few months.. they keep getting better and better!
Oh yeah.... in case you're wondering what's in that bulging little envelope? It's totally all of Moriah's baby teeth!!
Why do we feel the need to keep these things?! LOL!
And once I knew, I actually didn't think I'd have any reason to use it. But then I caught sight of this picture of my dirt-covered snotty-nosed little Judah-bug and knew I'd found the perfect place to put it!!

For the record, there was also a #wcw in the packet as well... and despite using up quite a few of the other pieces on this spread I couldn't quite pretend to be that hip and use it as well!
Most of the cards and other embellishments on this spread though actually come from the May Documenter kit from Studio Calico called 'Alfresco'. It's such a favourite of mine. I have completely and utterly fallen in love with their kits again the last few months.. they keep getting better and better!
Oh yeah.... in case you're wondering what's in that bulging little envelope? It's totally all of Moriah's baby teeth!!
Why do we feel the need to keep these things?! LOL!
Sunday, September 3, 2017
Studio Calico Starlight - the Spetember Release
Oh man, it was totally time I dusted off my layout-making skills and put something big on a 12x12" piece of paper again! The September scrapbook kit from Studio Calico was exactly what I needed to inspire me. The colours and designs in this kit are totally me!
But thinking I might be a little rusty I decided not to go too crazy. I used a 8x12" photo to dominate the page and then just added some clusters of cute things, and highlighted the colours of the photo with some paper strips.
Everything on this page is from the Main Kit Only, with the exception of the alpha stamps I used to create the title. They're called Blocked Alpha and Numbers and are available as a separate purchase.
I love the combination of this bold graphic alpha with a handrawn feel to it because of the scribbly shadow. I stamped my title onto watercolour paper with black embossing powder, then coloured them with Color Theory Inks to match Bethany's shirt in the photo. Oh... and then I ended up adding Stickles over the top for some glitter. Couldn't help it!
But new layouts aside, it was the new release stamps Studio Calico specifically asked me to play with, and I couldn't be happier to agree to that! They asked me for 3 cards... I 'accidentally' made 6!
(Yes, I know I'm only sharing 5 here, but the last card I'm not overly happy with so I'm not sharing it! LOL!)
I first started with the Thanksgiving stamp set with it's grassy frame type of stamp, and a million options for sentiments to pop inside. I had this idea for how I wanted the finished card to look, but I wasn't sure if it would work, so I did a mock-up version first with a blue and yellow background. It seemed like it would turn out ok so I did my 'good' version in the yellow-pink-red-blue spectrum. I finished it off with some puffy asterix from the Scrapbook Kit.
But I kept looking back at my mock up version and couldn't bear to throw it away. It's not perfectly stamped but I figured I would finish the card anyway, and try to cover up the defects with buttons! LOL!
And now I have a set!
I fell in love with the Fall Plants set. I think it's my favourite! It has a great mixture of flowers and vegetables (of all things!) and my 'failed' card featured the carrots. But then I had an idea to just take one of the flowers - the layered pansy - and stamp a whole field of them in rainbow colours. I wanted it to represent reproduction and growth and fertility to match the sentiment from the same set. I'm always in need of new baby cards so this is perfect.
Another delicate and elegant stamp set from this release is the Floral Thank You set. It's got a mixture of detailed floral images and bold graphic sentiments. They work together really well, so on this card I decided just to let them shine by themselves. This is about as CAS as I can get!
And lastly I took the Everyday Magic stamp set and whipped up this final card. There are lots of great images and funky sentiments in this set, but I stuck with just a couple. I was inspired by the 'heart of gold' phrase and had this idea to stamp a grid design of the hearts in gold. Pretty obvious right?! To kick it up a notch I also took the same heart stamp, inked it up with Color Theory inks, spritz it with water and then slammed it down on the paper to create the splatters behind each one. Messy but fun!
The Studio Calico September kits are called Starlight and they're now available.
You can find all the stamp sets I've worked with as add-ons in the shop here. Which one is your favourite?
But thinking I might be a little rusty I decided not to go too crazy. I used a 8x12" photo to dominate the page and then just added some clusters of cute things, and highlighted the colours of the photo with some paper strips.
Everything on this page is from the Main Kit Only, with the exception of the alpha stamps I used to create the title. They're called Blocked Alpha and Numbers and are available as a separate purchase.
I love the combination of this bold graphic alpha with a handrawn feel to it because of the scribbly shadow. I stamped my title onto watercolour paper with black embossing powder, then coloured them with Color Theory Inks to match Bethany's shirt in the photo. Oh... and then I ended up adding Stickles over the top for some glitter. Couldn't help it!
But new layouts aside, it was the new release stamps Studio Calico specifically asked me to play with, and I couldn't be happier to agree to that! They asked me for 3 cards... I 'accidentally' made 6!
(Yes, I know I'm only sharing 5 here, but the last card I'm not overly happy with so I'm not sharing it! LOL!)
I first started with the Thanksgiving stamp set with it's grassy frame type of stamp, and a million options for sentiments to pop inside. I had this idea for how I wanted the finished card to look, but I wasn't sure if it would work, so I did a mock-up version first with a blue and yellow background. It seemed like it would turn out ok so I did my 'good' version in the yellow-pink-red-blue spectrum. I finished it off with some puffy asterix from the Scrapbook Kit.
But I kept looking back at my mock up version and couldn't bear to throw it away. It's not perfectly stamped but I figured I would finish the card anyway, and try to cover up the defects with buttons! LOL!
And now I have a set!
I fell in love with the Fall Plants set. I think it's my favourite! It has a great mixture of flowers and vegetables (of all things!) and my 'failed' card featured the carrots. But then I had an idea to just take one of the flowers - the layered pansy - and stamp a whole field of them in rainbow colours. I wanted it to represent reproduction and growth and fertility to match the sentiment from the same set. I'm always in need of new baby cards so this is perfect.
Another delicate and elegant stamp set from this release is the Floral Thank You set. It's got a mixture of detailed floral images and bold graphic sentiments. They work together really well, so on this card I decided just to let them shine by themselves. This is about as CAS as I can get!
And lastly I took the Everyday Magic stamp set and whipped up this final card. There are lots of great images and funky sentiments in this set, but I stuck with just a couple. I was inspired by the 'heart of gold' phrase and had this idea to stamp a grid design of the hearts in gold. Pretty obvious right?! To kick it up a notch I also took the same heart stamp, inked it up with Color Theory inks, spritz it with water and then slammed it down on the paper to create the splatters behind each one. Messy but fun!
The Studio Calico September kits are called Starlight and they're now available.
You can find all the stamp sets I've worked with as add-ons in the shop here. Which one is your favourite?
Wednesday, July 19, 2017
A Card for Every Baby!
Soooo many people around me are having babies at the moment. And I don't just mean my patients! I mean, my friends, my colleagues and my family are all popping out little bundles of joy which means I need quite the stash of cards for baby showers and birth announcements etc etc. Here's a few that I've made recently....
Firstly, I've got this very non-traditional approach to a baby shower card. I mean, dinosaurs? But when I saw the little triceratops on the skateboard as well as the little hatchling then I knew it could work. Not biologically of course. But the cuteness factor is still there right?!
Plus, it was a great excuse to bust out this Neat and Tangled Prehistoric Stamp and Die set and give it some colour. It's one of my new favourites!
For this card I decided to gather all my cute little baby animal stamps from across a number of different sets and go with a more traditional pastel and floral approach ;-)
No actual baby-specific stamp sets here, in fact, the bear and bird are from a Neat and Tangled set called Lumberjack Love, and the rabbit, carrots and flowers are from an Easter set called Cottontail Cuties!
Thinking along similar lines of having a cluster of cute celebrating animals I also created this one. The main difference being that this IS a baby-themed stamp set. It's a much older Studio Calico set that's unfortunately no longer available.
I think I need to use my letter stickers on my cards more often - I love this look!
Lastly (for now at least) I made yet another similar version by stamping and embossing the baby animals over an inked background. To create the slightly bleached look I painted them with plain water before mopping up the excess. This removes some of the coloured ink as well which makes the images stand out more.
Are you crafting on this happy hump day? I hope so!
xx
Firstly, I've got this very non-traditional approach to a baby shower card. I mean, dinosaurs? But when I saw the little triceratops on the skateboard as well as the little hatchling then I knew it could work. Not biologically of course. But the cuteness factor is still there right?!
Plus, it was a great excuse to bust out this Neat and Tangled Prehistoric Stamp and Die set and give it some colour. It's one of my new favourites!
For this card I decided to gather all my cute little baby animal stamps from across a number of different sets and go with a more traditional pastel and floral approach ;-)
No actual baby-specific stamp sets here, in fact, the bear and bird are from a Neat and Tangled set called Lumberjack Love, and the rabbit, carrots and flowers are from an Easter set called Cottontail Cuties!
Thinking along similar lines of having a cluster of cute celebrating animals I also created this one. The main difference being that this IS a baby-themed stamp set. It's a much older Studio Calico set that's unfortunately no longer available.
I think I need to use my letter stickers on my cards more often - I love this look!
Lastly (for now at least) I made yet another similar version by stamping and embossing the baby animals over an inked background. To create the slightly bleached look I painted them with plain water before mopping up the excess. This removes some of the coloured ink as well which makes the images stand out more.
Are you crafting on this happy hump day? I hope so!
xx
Thursday, July 13, 2017
The Awesome Krumspring Peacock
Did you know that 'krumspring' is a Danish word which means 'doing something in a funny or non-traditional way'? That's probably why I love working with my Krumspring stamps so much.... because they always inspire me to make something a little bit different!
During June at Krumspring we celebrated Summer by making cards that best represented the season. Summer makes me think of birds and animals and being outside surrounded by nature, so I started my card with the gorgeous Peacockness stamp, and built it up from there.
Of course, I couldn't help but colour my peacock in with a rainbow of colours! I used Zig Clean Colour Real Brushes on the watercolour paper I stamped him on, and finished off with some Wink of Stella to add some shimmer.
To build my little window scene I stamped 'One Triangle at a Time' in green ink and coloured in all the little segments with various other green inks. The leaves are a Sizzix die called 'Garden Greens', and the frame is designed by Tim Holtz. It's called 'Stitched Rectangles'. Whilst the 'awesome' die comes from Studio Calico. Talk about mix and match!!
You can catch more summer-inspired Krumspring cards on their original blog post here.
xxx
During June at Krumspring we celebrated Summer by making cards that best represented the season. Summer makes me think of birds and animals and being outside surrounded by nature, so I started my card with the gorgeous Peacockness stamp, and built it up from there.
Of course, I couldn't help but colour my peacock in with a rainbow of colours! I used Zig Clean Colour Real Brushes on the watercolour paper I stamped him on, and finished off with some Wink of Stella to add some shimmer.
To build my little window scene I stamped 'One Triangle at a Time' in green ink and coloured in all the little segments with various other green inks. The leaves are a Sizzix die called 'Garden Greens', and the frame is designed by Tim Holtz. It's called 'Stitched Rectangles'. Whilst the 'awesome' die comes from Studio Calico. Talk about mix and match!!
You can catch more summer-inspired Krumspring cards on their original blog post here.
xxx
Tuesday, July 4, 2017
Jot Magazine Issue 18
I had a few projects featured in the free digital magazine. My favourite was this layout I created about Judah's language development. The theme was actually about journaling, and since I had a lot to say on this subject I needed to make a crazy amount of space on my page to fit it all in!
But I didn't want the layout to be boring so I made the journaling into one of the feature points of the whole page. To create this effect I first traced around some giant chipboard letters, and then handwrote all my journaling around the outlines - stopping words half way through if necessary to make them fit nicely. I erased the outlines at the end so all I was left with was the impression of the word 'word' ;-)
The other things that made me happy about this layout is that I used up a really old Jenni Bowlin Studio kit to make it - and I still believe it looks as fresh and fun as if I'd used new product! And see the trees? They were leftover Sizzix "Woodland" diecuts from a failed first attempt at this card I made for a Mood Board challenge a couple of months ago.
The second project I made for the Issue was for the Pocket Pages gallery. I've never made a pocket page before, but you know me... always up for a challenge! And it was super fun!
The way I figured it was that I would at some point give this away, and I wanted the recipient to be able to pluck out any of the 3x3" cards and use them as embellishments in their own album. But at the same time I wanted the whole page to have a cohesive colour scheme, so I stuck with these green, red, yellow and woodgrain tones.
I took the opportunity to also have a play with some new supplies, and I especially love that little card with the moustache and tie. It's created with a new Sizzix die called "Looking Dapper".
And lastly I made a double-page spread for the Project Life gallery. I always use a new Issue to prompt me to hurry up and make another page for my album! This is the January spread for my 2017 album, so clearly I was really behind at the time.
The good news is, currently I'm up to Easter... so I'm slowly catching up to real time!
I used a combination of Studio Calico's January Documenter Kit "Roman Holiday", and the Bella Blvd Illustrated Faith collection "You Are Loved" to make the spread and I'm really enjoying the green, pink and black&white combo here.
You can download your copy HERE.
Friday, March 3, 2017
Studio Calico Crop Weekend
A couple of weekends ago Studio Calico held a crop with quite a few challenges. I was in the mood to be inspired in a fresh direction so I played along with a couple of the ones that really spoke to me, and created these two cards.
The first challenge I wanted to try out was Lisa's "over-stamping" technique, which is effectively about stamping in layers with different coloured inks. I've had this Houseplants stamp set in my stash for a couple of months and it was still untested so I pulled it out to play, and quickly whipped up this card...
I used the same Houseplants stamp set, and the same Color Theory Inks that I used for the first card. It was also supposed to be a one-layer card.... but try as I might I couldn't just leave it as a stamped background and had to add a few dimensional embellishments too. Whoops!
It was so nice just to create something quick and easy without needing to think about it too much, and just for the fun of it!
The first challenge I wanted to try out was Lisa's "over-stamping" technique, which is effectively about stamping in layers with different coloured inks. I've had this Houseplants stamp set in my stash for a couple of months and it was still untested so I pulled it out to play, and quickly whipped up this card...
It was so quick and easy that I immediately moved onto another challenge, this time trying out Carson's "multi-ink spritz" technique. It was slightly similar, with the idea being to ink up your stamp with different coloured inks at the same time, and then spritz them with a little water before stamping them to create a bit of a water-coloured effect.
It was so nice just to create something quick and easy without needing to think about it too much, and just for the fun of it!
Subscribe to:
Posts (Atom)