Pages

Showing posts with label Scrapbooking from Scratch. Show all posts

Sunday, August 1, 2010

Make the world a cuter place

What's the only thing better than a banner?

(that's a trick question)

The only thing better than a banner is adding another fun element alongside it...... the pinwheel!!
They seem made for one another. They just ooze fun and frivolity and whimsy, and were perfect for this layout I did for Scrapbooking from Scratch.


They're really easy to make too. Let me show you.....


Step 1: Cut a square from a scrap piece of paper. This one is approximately 2 x 2" You can choose to get all perfect and particular and measure it and cut it with your paper-trimmer, or you can choose to throw caution to the wind (aka. my style) and cut it freehand. It's very forgiving :-)


Step 2: Cut diagonally in from each corner towards the centre. But stop before you cut all the way across your paper (too easy to do let me assure you!!)


Step 3: You can't see in the picture but I've stuck a little square of double-sided tape in the centre to which all of my 'blades' will stick to. So all you do is fold one corner from every triangle in towards the middle and stick it down.


Step 4: Repeat with each corner. You'll need to secure the centre otherwise they'll start flicking back up again. A brad is the perfect solution for this.

See, I told you this was easy :-)


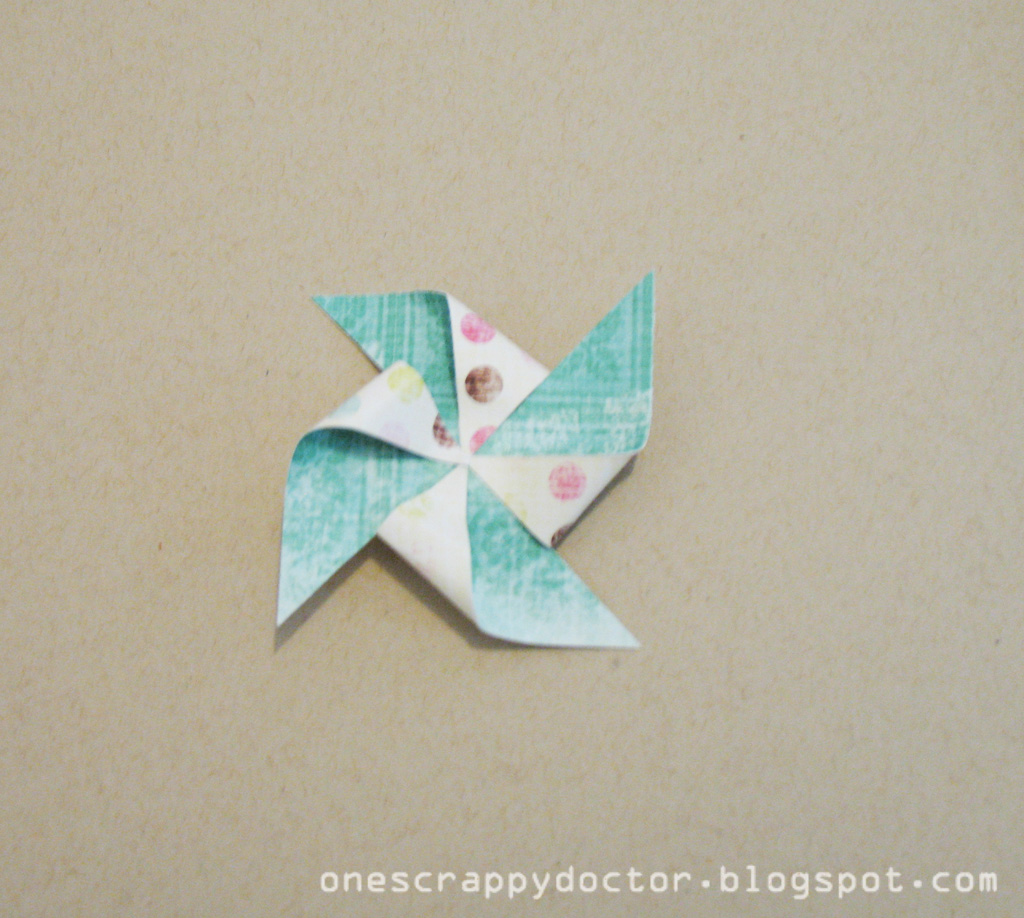
Step 5: You can choose to leave them just like it is in step 4 (plus a brad) or go the extra level and layer a smaller pinwheel on top before adding your brad like I've done in this example.


Either way I think they look fabulous and they added the right amount of extra texture and dimension to this layout. If you wanted to get really tricky you could pin them to your layout with the same brad so that they might even spin around like a proper pinwheel. I figure there won't be much spinning once this baby gets inside a plastic sleeve and stuck in an album :-)


Yes, that's my girl.... making the world cuter one smile at a time.

All the products in this layout (except the brads) were made with the July kit from Scrapbooking from Scratch. The papers are mainly Fancy Pants Wishful Thinking, with one My Mind's Eye paper thrown in for good measure. Beautiful Blush Foam Thickers and some ribbon.

Many thanks to Peta for having me as a Guest DT for Scrapbooking from Scratch in July. I had so much fun playing with this gorgeous kit and I really love the projects I was able to make from it. I ended up with three layouts and a mini-album which I think proves what fabulous value it is. All I've got left is about 2 inches of scrap paper and a couple of random stickers! I'd seriously think about picking up that last kit if I were you!

Friday, July 30, 2010

I'm Not a Chatterbox

Do you think it's cheating in a way if I use my July kit from Scrapbooking from Scratch, which was provided to me as the Guest Designer, to make one of my monthly Year in the Chair layouts? I mean, this is something I do every month for myself regardless of product, is it wrong to use the lovely Fancy Pants and My Mind's Eye kit? I hope not, because I did it already :-)


Everything on this page (apart from the Studio Calico 'June' stamp) is from the kit, and it was just perfect for my photo. Girly and fun and delicious! There's more of those banners. I'm pretty sure I used them on every one of my pages I created. You can see I layered a couple over the actual paper to create some dimension on the page. It was by pure fluke and coincidence that I had already fussy cut lots of strings of the banners, and that this one matched up with the underlying banner on the page.


And check out those Thickers too. They were just divine. Despite having two girls I hardly ever seem to buy pink alphas, but this has won me over big-time! The pale pink 'Blush' foam Thickers were just the right colour for these papers, and worked wonderfully with both the kraft and white cardstock that came in the kit.


I put my Heidi Swapp Edge Distressor to good use on this page..... and my sewing machine! There doesn't seem to be a layout that passes my desk without getting a run on the sewing machine these days. (Except ironically for a layout I did yesterday about my old sewing machine - but I'll save that for another day!)

And see the edges of the kraft cardstock? I used one of the stencils I showed you how to make in the last post and inked all around the edges. I'm not entirely sure about the end result.... but hey, it's interesting. And you know I can never leave anything well enough alone :-)

If you want to pick up one of these fabulous kits for yourself you better get your skates on because there is only one left. But don't worry, even if you miss out on this kit - check out the massive sale Peta is having on lots of the past kits at the moment. Gotta make way for CHA!

I've got one more project left to show you from my July kit. And yes, I'm saving the best for last :-)

Wednesday, July 28, 2010

Tutorial - Make Your Own Stencils

Today I want to show you a fun way to make your own stencils so you can customise your pages and make them unique.

Stencilling is a really good technique to have up your sleeve as it's a quick way to add another dimension to your work without adding bulk. One of the scrapbooking masters of the stencil is Dina Wakley and if you aren't familiar with her work already then I highly recommend you check out her blog.

So the first thing you need to do is decide on your stencil design. I Googled a few of my ideas and then printed out the patterns I liked. Make sure you choose something that's not too intricate or you'll struggle to cut it out. The top pattern in my picture below I used as a guide only - I only cut out the inside 'windows', not the whole design.


Both of these are printed on the same A4 piece of paper. I knew I only needed them reasonably small for my purposes today (for my mini-album), but you can do them any size you like. I have done a 12x12" one before which is perfect for scrapbook layouts. You can see a couple of my pages I've done with this technique here and here.


Next you need to trace the designs onto a sheet of acetate (if you don't have acetate perhaps have a look at your packaging because really, any clear plastic will do. What I've used is in fact overhead transparency sheets). At a pinch you can just use cardstock. The only problem with that is it won't last very long once they start getting soggy with paint and mist and in. Trust me :-)


Then you need to get out your trusty craft-knife (or scalpel as the case may be!!) and cut away all the inside bits. Then it's a simple matter of laying your newly created stencil down on your page and misting (or painting, or inking.... whatever!)


Another advantage of using acetate is that you can then get another use out of the same application of mist. Once you've used your stencil the way it's intended, simply (but carefully!) flip the stencil over and lay it down on a second piece of cardstock and use it like a stamp. You'll end up with both the positive and negative image. Brilliant hey?! And you won't waste any of your precious Glimmermist :-)


In the end I used each of my stencils (and 'stamps') twice which was the perfect amount of pages for my mini-album. Once they've dried you can use them like you normally would. Add your photos, your embellishments and journalling, bind them all together and you're done!

Here's some of my completed (stencilled) pages.


I created this album using the July kit from Scapbooking from Scratch (all I added was the cardstock). All of the 12 tags are from a single piece of Fancy Pants Wishful Thinking paper called 'WT cards'. That made it so much easier to put this album together.

You'll also notice the fun tickets which are from My Mind's Eye Little Miss Muffet 'That's My Girl', and the occasional sticker from MME as well.

And of course, the most important part of a mini-album is the front cover right?!


In the kit you get this brilliant piece of chipboard from Twiddleybitz which is intended to be broken up into pieces and used as embellishments. But I decided to leave it just as it was because it was the perfect size to become my front cover. I mounted it onto the Fancy Pants Wishful Thinking 'Memories' paper and painted it with coordinating colours before adding a cluster of embellishments and my title. Even the gorgeous ribbon that I used as a closure is included in the kit.


Here's a couple more pages for good measure....


And even though I had run out of labels by then, I couldn't resist adding these photos of my cute little Munchy making some funny faces.


Alright, there you go.
Let me know what you think, and definitely let me know if you try this out. I would really love to see what you create :-)

Tuesday, July 27, 2010

There Was a Little Girl

Just popping in quickly (I feel too sick otherwise) to show you the first layout I created for Scrapbooking from Scratch.


The July kit is really gorgeous. It's filled with Fancy Pants Wishful Thinking mixed with My Mind's Eye Quite Contrary Little Miss Muffet. And I love it!!!


For a start, do you see the bunting? It's all cut from one of the FP patterned papers in the kit. As soon as I saw it I knew it wasn't going to stay as a square sheet..... it was destined for fussy-cutting!!


Then there was some fun tickets and embellishments which are all from My Mind's Eye. I'm so into tickets right now. I surprised myself by only including one of them on this layout (don't worry, you'll see where the rest went later!)

Quick, only two kits left............

:-)

Wednesday, July 21, 2010

Her Colourful Kingdom

I think I may have mentioned it (once or twice!!) that I've finally bitten the bullet and subscribed to the wonderful Studio Calico kits. The June kit was my first one, and although I've only shared one layout I have made with it - I am actually up to number 6 which is this one........


I decided to take part in this week's Sunday Sketch on the SC blog. The sketch (from a layout by Stephanie Wheeler) looks like this:


All those circles were supposed to be punched shapes and die-cuts. But I thought I would change it a bit for me, and instead I layered up all those paper strips. You may have noticed that's my go-to technique at the moment!


And then I fussy-cut the sunflowers and the planes to represent at least some of the circles :-)
Can you see that "Girl's Only" tag peeking over the top? That's the very last tag I had left over from my Scrapbooking from Scratch July kit. It just seemed the perfect finishing touch.


And I simply loved those alphas that came in one of the add-on kits. It's pretty much why I bought it too (that and the washi tape that was included). Even The Man has noticed that I've used this alpha on all of my SC layouts (apart from one!) because he asked me if this was my favourite alphabet?!

Reminder to Myself: Share more of my Studio Calico layouts

Friday, July 16, 2010

Barely had time

to scratch myself since I received the gorgeous July kit from Scrapbooking from Scratch. It's filled to the brim with Fancy Pants Wishful Thinking and My Mind's Eye Little Miss Muffet and let me tell you, it is stunning!! It was all I could do to not rip it open and devour the whole kit in one sitting. As it was I used every single bit of it within two days :-) I swear, all I've got left is about 2" of paper, and a couple of stickers. The rest has now been reconstructed into something even better!


This kit is perfect for scrapping girly pictures, which is lucky for me, because that's pretty much the vast majority of what I scrap! And without adding anything to it apart from some more cardstock I was able to make 3 layouts and an 8-page mini-album with this kit. It's such good value for only $30


Here's some sneaks of the first two layouts that I created. To see them in full and to order a kit for yourself pop over to Scrapbooking from Scratch. These kits tend to sell out fast so you better hurry!


I'll be back later on this month to show you the other layout, the mini-album and not one, but two tutorials that I put together for this kit.
:-)

LinkWithin

Related Posts with Thumbnails