Pages

Showing posts with label Martha Stewart. Show all posts

Thursday, October 10, 2013

The Story of the Peacock

I grew up surrounded by animals. Living on a dairy farm means obviously there are cows, but at one time or another there were also horses, pigs, goats, dogs, cats, a variety of different birds both 'decorative' and practical such as chickens..... and there was also a family of peacocks.


The peacock himself was a creature of mystery. He simply flew into the farm one day (fully grown) and decided to stay. Feeling sorry for the lonely bird we purchased a female companion and together they raised many litters (? pretty sure that's not the right word!) of baby peafowl.


Peacocks aren't the first animal that comes to mind when you think about farms, and it was always a dichotomy of values to come across one of the beautiful discarded feathers in amongst the cow pats! Ever since that time the peacock has remained an enigma in my mind. Surely they're amongst the world's most beautiful creatures. They remind me of the intricacy and depth of the splendour of Creation.


So when I heard my sister (from Jasper Lane Designs) was doing a celebratory Facebook Showcase for her 30th birthday that features 30 of her favourite things and that one of the themes up for grabs was "birds" I knew just what I was going to do. I hand-painted and stenciled this peacock design with India Ink and then filled it in with watercolours and Glimmermist. I added detail to the body with Liquid Pearls and shimmer to the feathers with Martha Stewart glitter.


The photos don't really do it justice, and it's quite a textural piece in real life. Now I'll be sorry to see this go because it's making a lovely display on my bookcase right now, but it is up for sale in the "30 Favourite Things" Showcase tonight. It begins at 8pm (Victorian time) and I would love for you to come over and check it out. The other 29 items are pretty spectacular too!

Photobucket

Friday, April 1, 2011

No Limits

My grandfather-in-law (meaning Munchy's great-grandfather) still chases after her at age 89!


They (her great-granfather and great-grandmother) bought her a bike for her last birthday and they both got so much joy out of watching her squeal in delight as she learnt to ride it in their front garden.


Oh yeah...... loving the new addition to my scrappy family.... my Silhouette! I just find I can let my imagination wander into every realm possible for titles and embellishments and my Silhouette can deliver :-)


I used my January Studio Calico kit for this layout "Who's Who" and the add-on "Buster Brown" (which is still available can you believe?) with the help of my favourite Martha Stewart punch "Cherish".


Sometimes I think I really should do more 8.5 x 11" layouts. It pays not to get stuck in a rut hey?

I'm planning on drawing a winner for my "Choose Your Own Giveaway" giveaway tomorrow - so there's still time to enter!

Monday, January 10, 2011

My Girl Turns One

Of course, I'm still going to do pages that celebrate the moments and events. It won't only be soppy gushy emotional pages! My baby girl having her first birthday is a moment to be remembered!


I used the January sketch at Handmade by Suzanne, but I did have to re-jig it a bit. This month we have as our Guest Designer the amazingly talented Sam Hauzer, and she designed this great sketch.


But I'm using Webster's Pages WonderFall Collection and the papers already come with so many details that I found I didn't need to add much to them, nor did I want to cover them up too much. So instead of the two photos I just used one.


I still added lots of layers under the photo as the sketch called for - using paper and stickers and stamps. Can you see the shine on my stamped doilies? I stamped with Perfect Medium and brushed blue Perfect Pearls over the top of it for a bit of glamour!


I used these balloons for the embellishment cluster in the top right corner as per the sketch, but decided to leave the bottom left corner alone since it had all the cute designs on it already. I love the way the twine dangles so freely from the balloons, like they're really floating away through the air :-)


And my Martha Stewart punch collection is ever-expanding. This is my latest purchase which you can see in use on the blue paper matting the photo. It's the punch-around-the-page 'Cherish' set which I got from here. These punches were recently just offered at Studio Calico and were sold-out within minutes, so if that's any indication this will be the hottest punch to have next month! But if you live in Australia and buy from Suzanne you'll only pay a flat rate of $5 postage no matter how many punches you get!

Sunday, January 2, 2011

Glamming it Up Again

I'm addicted to my Martha Stewart glitters at the moment, so I couldn't stop myself after yesterday's effort and went straight on and did up another glittery card for the Moxie Fab World Glitter is Glam challenge.


Sorry, I realise it's a bit hard to see the glitter on this card.
It's mainly because instead of doing some cute highlights in glitter, or some glittery embellishment I simply just smothered the whole thing in glitter!


I effectively made my own glitter paper by smearing on some dimensional magic all over my October Afternoon paper (my single favourite paper from last year) and up-ended my bottle of crystal glitter all over it!

Believe me, it looks so much nicer in real life :-)

Saturday, January 1, 2011

Glitter is Glam

How about starting the new year with a new technique?


I really wanted to take part in the Moxie Fab World Challenge: Glitter is Glam where the challenge is to use glitter in a new and innovative way. Here's what I came up with......... "Embossed Glitter"
I'll show you how.


Gather some supplies. A sheet of patterned paper, an embossing folder, glitter and glue is all you need really. The stamps are for decorating later.


Use a drop sheet (I use some scrap paper) underneath you at all times for this messy technique!
Shake glitter all over your open embossing folder so it fills all the imprinted design. 


You want to brush away as much of the excess glitter as possible so that it's only in the 'holes'. I tried a paint brush but that wasn't working so well. I found an old credit card to scrape off the extra was the best solution. But it won't be perfect and I've learnt to live with that :-)


Put your patterned paper on a flat surface and cover every inch of it with glue. To get an even coverage I found a glue stick worked the best.


Then put the paper (glue side down) on top of the glitter in the embossing folder and run it through your machine as normal. Mine made this awesome crunching sound as all the glitter was embossed onto my paper!


Quickly peel away your sticky glittery paper and put it down somewhere to dry. While you're waiting, go and wash your sticky glittery embossing folder :-)

Now create!


It's hard to capture the intense glittery-ness of this card in a photo, but it sure was 'Fun Times' putting this together :-)


I used a very fine pink Martha Stewart glitter in the first card, and then I tried it with a coarser glass glitter for this card. 


The end result seems very similar, but I did find it was harder to scrape off the extra glitter in my embossing folder whilst keeping it confined to the imprinted design. It still does make me Smile though :-)

Anyway there you go. Hopefully giving you some good ideas - now go forth and experiment!

Tuesday, December 28, 2010

Sweetest Day

Just trying to finish my Year in the Chair album before the end of the year!
I posted my October layouts here and here, but had skipped ahead without realising that I hadn't done my September layouts!


I am using the stunning Sweetness collection by Pink Paislee for these two layouts. In all honesty I truly love these papers, but they are a little hard to work with.


I was quite happy with how this first one turned out though. Lots of colour and a little texture too!


And the helpful addition of some new Martha Stewart punches!
Firstly, it's that corner punch you see above (I got the set, but haven't used the border punch yet)


This page I had a little more trouble with, but it's still alright I think.
Hey, at least it's another page finished :-)


And how cute is that Love Dove punch from Martha Stewart that I used all over this page?


I've also used the Flip Notes from the same collection, and some Maya Road doily transparencies too. 
Just my November layouts to go and then I'm finished (I started in December when Moodles was one month old, so the November layout is at her 1st birthday and hence why it's finishing then rather than December).

Sunday, December 26, 2010

Walk With Me


Supplies: Pink Paislee Parisian Anthology paper, Glimmermist, Dear Lizzy & American Crafts Enchanted papers, brads and journaling spots, Dear Lizzy rub-ons, Cosmo Cricket Togetherness chipboard, Glitter foam Thickers, Martha Stewart punch.


I figured she would walk by Christmas - she's was making lots of efforts to. She can stand quite confidently by herself, even get up to standing without pulling up on anything. But the second she wants to actually move anywhere, she'll get down on the ground and crawl.


She just lacks confidence - she most certainly has the desire to ambulate. Whenever she's holding someone's hand she can walk along at quite a pace!


Munchy walked on her 1st birthday, and Moodles turned 1 in November so without any expectations or pressure I imagine it won't be long now :-)

ETA: In fact, in between writing this post a week ago or so and publishing it today, she has indeed began to walk. Clever little Moodles!

Friday, December 24, 2010

Recycled Christmas: vintage paper wreath

This was originally posted on Julie Balzer's Holidays Handmade series. 

For the past few years my Mum and my Aunt have been taking in turns hosting our big family Christmas dinner. In all honesty, it's turning into a bit of friendly competition as they keep trying to outdo each other in the cooking/hosting/decorating stakes. It's currently at the point where my Mum had asked me and my sister to start thinking about ideas for a theme in March!!


Now it just so happened that I won a copy of GreenCraft magazine around about the same time and it was just so inspiring that I automatically came up with the idea of having a "Recycled Christmas" as our theme this year. And I've dutifully set about making some very simple decorative items for our party.

First up was a wreath for the door. I cheated a little bit when I decided the easiest way was to buy a foam base for my wreath! If you want to remain true to the idea of recycled/green products you could make your own from vines or something similar - but this was just way too hard and time consuming for me at this time of year :-)


So I painted my foam wreath with a gold acrylic spray-paint, not being aware that some chemical in the paint would eat away at the foam and leave a result like this swiss-cheese appearance. Oh well! It's going to get covered up anyway, but perhaps you might want to do it the old fashioned way if you want to avoid this :-)


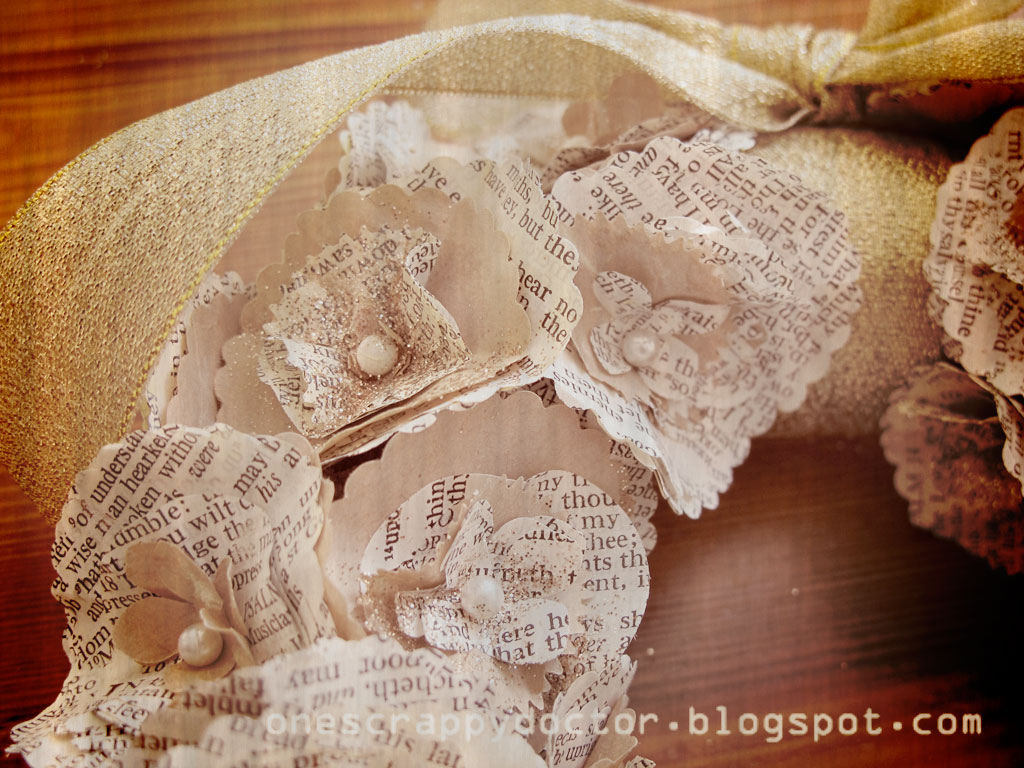
I love my punches! I don't think a scrappy project goes by without me cracking out some Martha Stewart :-) So I punched about a million (or at least that's what it felt like!) shapes from vintage book pages and a brown paper bag that I got as packaging.


Then I went about layering up lots of different shapes and securing them with a pin in the centre. Each of these flowers has at least 10 layers, but I didn't bother counting each one, I simply just grabbed a couple from each stack of my punched shapes at random.


Next you want to scrunch up the layers of paper to give it a bit more texture. I also sprayed a few with Irridescent Gold Glimmermist, and sprinkled some glitter on others. It's quite a similar method as Julie uses in her tutorial on newspaper flowers which you can read here.


Since I used pins in the centre of flowers (instead of brads or buttons) I could then very easily stick them into my foam wreath to make a lovely arrangement. And if I wasn't happy with the placement, then it was all too easy to pull them out and try again.


Lastly, tie a great big bow around the top to give it a bit of pizazz!


As you can see the materials and colours I have chosen are fairly monotone, but that's because along with our theme of a Recycled Christmas we've chosen cream, kraft and gold as our colour-scheme. But there's nothing stopping you from using more traditional supplies like scrapbook paper in red and green, or try other materials like fabric or felt for example. Go wherever your imagination takes you!


Handmade by Suzanne is having 35% off everything in her Christmas section. That's a lot of products by a lot of brands. You definitely don't want to miss out on this one! If you're anything like me you're going to take a lot of photos tomorrow which will need scrapping! 

Have a very Merry Christmas tomorrow :-)

Recycled Christmas: Monogram Badges

Well, these aren't recycled at all really. But they're part of our decorations for our Recycled Christmas dinner so I thought I would show you anyway.


Keeping with our colour scheme of cream, kraft and gold, I've also added some traditional red and green highlights to make these monogrammed badges.


Each of these little textural beauties will have a brooch pin stuck on the back of it and will then adorn our Christmas crackers. These will act as our place-names as we sit down for dinner, and then can be removed and worn throughout the evening.


To make these I started off die-cutting some felt flowers or circles (yes, you really can cut felt in your Cuttlebug!), adding a punched scalloped circle from kraft cardstock, and then layering some embellishments on top.


Basically I grabbed a whole bunch of random stuff from my stash that coordinated with the colour scheme. And added some glitter of course!


The monograms themselves are also just simply die-cut from red and green cardstock. 
I'll have to show you pictures later of our guests wearing them hey?!

LinkWithin

Related Posts with Thumbnails