Pages

Showing posts with label Escape 2 Create. Show all posts

Tuesday, June 10, 2014

A Little Bit of Loolabelle's Arty Stuff

Still catching up with a couple of things I've neglected to share here. This one dates back to March when I was away teaching at the Escape 2 Create retreat. One of the highlights of the camp was the opportunity to meet lots of scrappers I've only ever known online before... including someone I've admired for a very long time now, the remarkable Louise Nelson.


I just adore this lady's style, it's fresh and funky and always cutting edge. I love that she's never afraid to do her own thing and try new techniques constantly. Not only was I lucky enough to watch over her shoulder as she perfected some mono-printing, but I was blessed to walk away with two of my very own Louise Nelson layouts! Eeekk!


Created with each of my daughters in mind, this one captures Bethany's cheekiness as she pulls some faces for the camera. It's got all the Lou trademarks... chipboard pieces, dangling threads, paint splatters and a striking colour combo.


And the second one is about Moriah's cute giggly smile!


Love all the turquoise in this.


But what I love even more was the excitement on my girl's faces when I surprised them by hanging their layouts up in their room whilst they were out. We've only just recently stripped their walls bare to start afresh with the decorations, and so this was the first installment.


I think it's safe to say they both really appreciate them!!


And so do I! Thanks so much my dear friend Lou!
xx
Photobucket

Friday, April 18, 2014

More E2C projects...

Still haven't finished with sharing all the things I made whilst at Escape 2 Create. So here's a few more.....

But keep in mind, the photographs for these projects were taken with my phone whilst at the retreat, so please forgive the appalling quality of them :-)


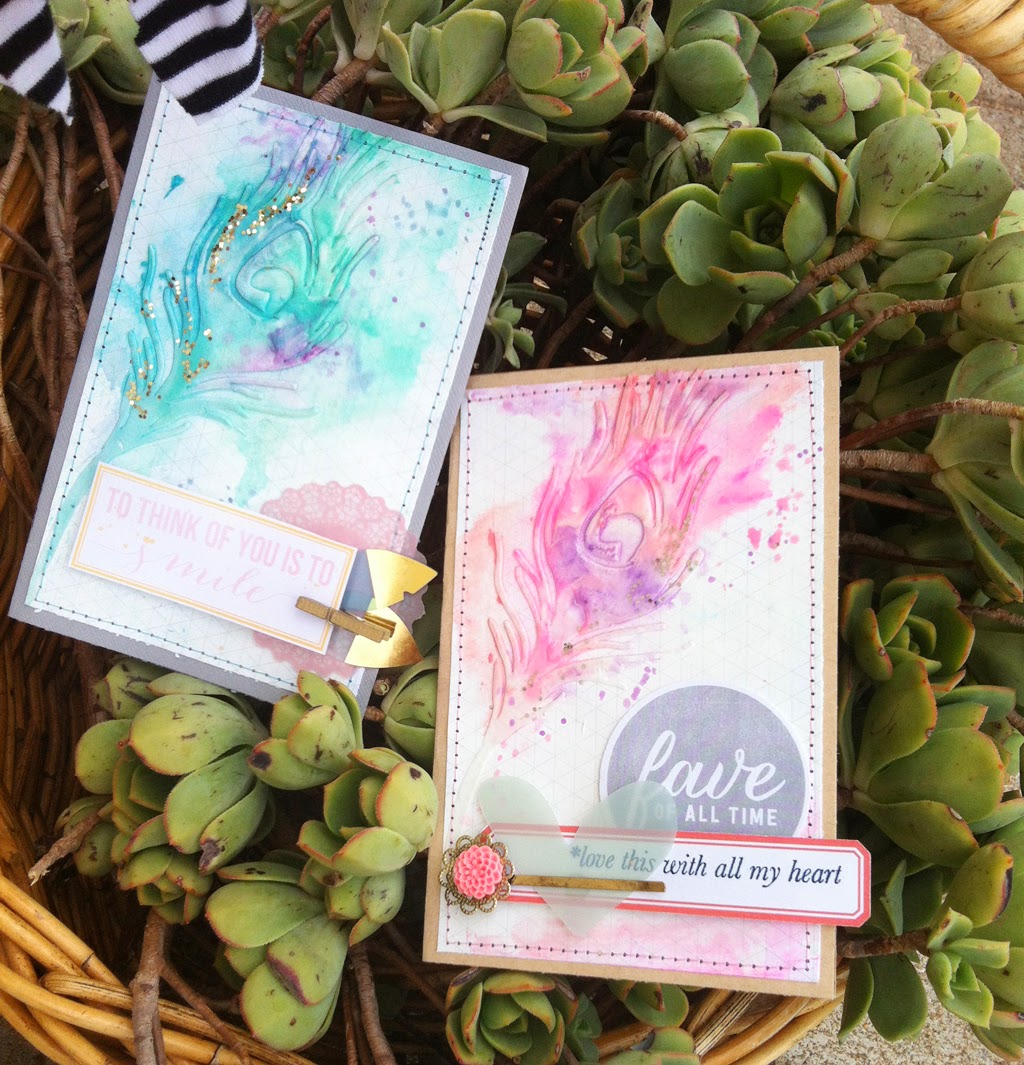
First up is this set of cards which I'm still kinda in love with! They went to 2 very special ladies at the retreat. Amanda and Meredith went above and beyond the call of duty as the organisers of this fabulous retreat and I'm certain will now be counted as true friends for many years to come. The backgrounds were created with an originally designed Louise Nelson peacock feather stencil and some texture paste, and then coloured with Gelatos.


One of the things I had on my "to do" list whilst at the retreat was a birthday card for my Dad. I started this card with that intention in mind.... but it became a little too child-like to really be considered fit for the occasion. I never actually got back around to making one for him - that job had to wait until I got home.... (and ended up being a disaster not fit for publication on this blog!! Thank goodness for understanding family!!)


A cute little girly card. These things will never go astray in my household with the abundance of princess parties and whatnot that we go to around here ;-)


This layout is actually really special to me. It's a bad photograph of it, and I've had to do that horrible blurring out of faces (I'm so sorry... but the photographs aren't of me or my family so I really don't have the right to share them without permission), but it's still a very special layout. Gifting this to it's recipient had us both in tears. 


Spot some familiar Aussie faces in the bunch?
Thanks E2C for the lifelong memories!

Photobucket

Thursday, April 17, 2014

The Story of the Kinder Mini

I shared with you in my last post how the inspirational Kim Archer had me excited about dabbling in a little Project Life for the first time. Well, in her jam-packed class she also had the time to take us through the creation of a little mini album as well!! So I'm here with you to share what I made for this too :-)


This is a super-cute little miniature mini! The outside covers only measure 3.5x4.5" and are constructed from chipboard covered in calico fabric which we sprayed with mist to decorate. I ended up covering most of mine up with an exclusive APOCD Wood Veneer Card which tells you exactly what the topic of my mini is about ;-)


The inside was sooo easy to construct that the creation of this 8 page book was finished in a flash. Because each page is simply a Project Life card with a photo and a touch of decoration! Can you believe it? What a great idea! Now I won't bore you with a thousand explanations of what I've used on each page. Suffice it to say there was lots of rummaging at the bottom of my past Studio Calico kits for all those little embellishments and bits and pieces that haven't been used yet, with a recurring theme of some new Dear Lizzy Stickers from here.


Happy memories of the first day of kindergarten all wrapped up in a nice little mini-album.... and only 2 months after the event! Pretty happy with myself right now ;-)

Photobucket

Thursday, April 10, 2014

The Story of Attempting Project Life!

Never in a million years! Never did I think I would actually ever bight the bullet and attempt a Project Life spread!

Now don't get me wrong.... I really love the concept. The idea of documenting the everyday stories is one that really appeals to me. It's a concept that I fully embrace in my scrapbooking layouts. But the reality of taking photos every day, jotting down notes, printing out photos and making weekly spreads is just not something that I can afford to do time-wise.

Or so I thought.


Because then along came Kim Archer and her fabulous class at Escape 2 Create and I found myself really enjoying this process of quickly slipping in pre-printed photos and ready-made journaling cards and adding just the bare minimum of embellishments. I guess it also helped that it was only a 6x12" spread, and I was using a kit .... but who doesn't have kits?! (And if you answered "me" to that question then I suggest you to first check out the available PL kits here!)


I didn't make my spread to encompass a whole week, rather it was just one event. But an event like a Fairy Princess Birthday Party (actually, it was Disney themed) automatically comes with a thousand photo opportunities, and therefore I had lots of photos to help tell the story. If I had made this into just a layout then I would either have to only use one or two, or make them really small. This way I got to include all the photos I loved from the afternoon.


When the thought occurred to me that I don't even have a Project Life album to put this into I was encouraged just to clip it into my regular scrapbook album. Genius! Who says you need to have a dedicated album? What I could see myself doing is making up a small spread every now and then and just including it in with the rest of my layouts. That seems reasonably do-able.


I will have to get better at photographing these though if I'm going to be doing it more often ;-)

Photobucket

Thursday, March 20, 2014

The Story of Scrapping Someone Else's Style

There's about a million things I loved about Escape 2 Create. I loved meeting the people, the amazing food, the free time, the new products, the constant inspiration, the scrap-til-you-drop attitude of everyone there! But one of the things I was most looking forward to was taking the classes from the other 3 amazing teachers; Kim Archer, Celeste Vermeend and Gina Rogers. So today I thought I'd share the layouts I made during their classes.


On Day One it was myself and Kim who taught our classes. Kim didn't teach a layout (.... but she did blow my scrapping mind! So I'm saving that for another post). The layout you see here is what I put together following Celeste's instructions for her happy bright summery page.


It was layer upon layer of Studio Calico goodness, who not only provided most of her kit supplies, but a truck-load of donated stash as well. Thank you Studio Calico for your immense generosity! It meant I had plenty to choose from when putting together this page. Most of it (at least the papers) is from the new Lemon Lush collection.


But there's lots of tags and buttons and clothespins and bows and sequins too! So many embellishments that I don't normally think of, but which created layer upon layer of colour and texture... which is definitely what I'm about when I scrap. It was insights like this which made me want to do the classes in the first place!


Overall, I really just enjoyed the fun bright frivolity of this page. Perfect for my summer time photo of the girls enjoying their new outdoor pool.


Then there was Gina's class, who taught us her layout (very similar to this one here). And above is my attempt at it. Gina has quite a unique style where she manages to pull together seemingly disparate scraps of paper and embellishments and form it together in such a way as to create a piece of art.


I am not that bold or clever! If I attempt those things it just ends up looking like a hot mess! So I took her papers and her design but added my own spin on it. I reverted back to my own basics, and that was to stick with a clear colour scheme and keep straight lines.


Oh, and I also needed to keep enough space for the necessary journaling ;-)


So here's what I learned: it's really awesome to take a class and try a layout in a different style. You'll probably discover more about your own style in the process as you figure out what bits you like and which bits don't quite fit you as well. It's really fun to scraplift someone's design but add your own spin on it. Thanks so much Celeste and Gina... your classes absolutely ROCKED!!


Photobucket

Saturday, March 15, 2014

The Story of my First Teaching Experience

Well... at least my first scrapbooking teaching experience!


I laughed a little inside whenever someone at work asked me what I was doing on my annual leave. I would reply, "traveling to Port Lincoln to teach at a Conference" because I knew they would automatically think it was something in the medical field and it would impress them immensely! Not suggesting that teaching scrapbooking is any less impressive.... just that.. well a lot of those doctory folk just don't really get it!! LOL!


So last weekend was the Escape 2 Create retreat in Port Lincoln and it honestly rocked my world! If you're an Aussie reader then you probably know all about this retreat and how awesomely popular it's become. I mean, the tickets to book a seat at this year's retreat sold out in about 2 minutes flat! And that's 80 seats! Even more frightening than that was the fact that they asked me to be a teacher at it, alongside such amazing talent as Kim Archer, Celeste Vermeend and Gina Rogers. I jumped at the chance but I'll let you know I was more than a little nervous!


I'm showing you the layout I taught because I wanted to show you how far I pushed the participants and what a challenge I set them! Not one, but two origami techniques with complicated instructions to verbally convey. I knew they could handle it though, and they were all committed to going on the journey with me to master these techniques. Thanks ladies!! And a great big thankyou to the good people at Jenni Bowlin Studios who worked with us to get a lot of the products for this page.


In fact, if anyone at the retreat has a photo or a blog post of their attempt at my layout can you either leave a comment or email it to me? I'd love to see all the finished products, and I'll include them at the bottom of this post.

(photo credit: Louise Nelson)

Just wanted to leave you with a little glimpse into the retreat (you can read a full commentary of the weekend's events on the E2C blog here). Here's a photo taken of me whilst I was teaching. Obviously I wasn't quite prepared for the photo, but it does sum up what it was like. There was a LOT of laughing! It was honestly quite a lot of fun!

I'll be back a little later with my versions of the other 3 lady's classes which I took. There was no way I was passing up an opportunity to learn something from these 3 masters of the art, and they pushed me in directions I never would have taken by myself.


So it looks like I've already got my next teaching gig already lined up! Have you seen the announcement of this today? Big Picture Classes are combining forces with Studio Calico to launch an epic event on National Scrapbooking Day. The aim is to flood Instagram with 10 000 scrapbook layouts using the hashtag #NSD10K on May 3rd, whilst also enjoying free classes from 10 recognised experts (well... at least 9!!) There will be an exclusive Studio Calico kit released on the day, but in the meantime you can enjoy the benefits of massive savings on some of their past kits.


All these kits are on sale now for $10 each, but you have to register for the event first! It's super easy to do, sign up here. It's FREE! You need to do it quickly though, already a couple of the kits have sold out.

Photobucket

ETA: Here's just one of the amazing layouts made by someone taking my class at Escape 2 Create. This is by the talented Kim Moloney... check it out....

LinkWithin

Related Posts with Thumbnails